

Red plastic is very sensitive to UV . Japanese RZV500R will hoften have their red switches faded
to pink by 35 years of Japanese sunshine , ( Japanese sunshine has a lot of UV , somehow ) (me think ) .
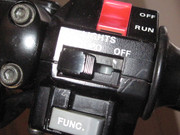
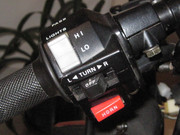
I refurbished my switches recently (red and grey) .These are "after" pictures . I did not take "before" pictures
(unfortunately) . They were quite pink , and part of the writing on it ,was gone .
This is what i did :
I dismantled completely the left and right hand switchgears , so to remove each individual red and grey plastic buttons.
You have to be very careful at this stage and study very well how thing are fitted before doing anything . the 37 year
old white internal plactic bits can be brittle and there are several small springs . Some white plastic parts have to
be slightly pried open (again be very careful and gentle ) .
You might consider trying to dismantle an old / damaged similar Yamaha handle switch from a less costly model (like
FZ750 fz600 , etc ) , just to get an idea how things are fitted together(i you never did it before ) .
If you are careful , it is quite doable .
Once you have the individual buttons , you have to remove may be an external layer of may be a few 1/100th mm that has turned
white due to UV , the underlaying plastic is still red , the the overall impression is pink .
Use abrasive sheets (for bodywork) with water starting with 500 grit then 800 , 1000 , 1200 ,1500 , 2500 , 3000 , 5000 , 7000 (always with water )
to remove this layer on every visible surfaces .(be gentle , and do not work too fast )
Then , use some red bodywork polish to buff by hand , with a cotton cloth (on red buttons ) (for grey buttons use white polish) .
Repeat the procedure , if needed , until you are satisfied withe color/shine of the surfaces .
Buffing can also be done with a Dremel and a soft cotton buffing wheel .But do not put much pressure , and don't run it too fast , otherwise
the plastic surface will melt ...
the "PASS" button has a groved surface , so , do not sand too much otherwise the groves will disapear or be very faded .
You have to compromise between removing the surface pink and not flattening the groves ...
After that , you will restore the the white engraved writing on the buttons :
clean the buttons with a mild detergent (washing up liquid ) to remove the oil from the polish .
use some white automobile touch up white paint (the one with small brush ) to fill the engraved
writing on the button . (it is ok if it overflow a bit ,out of the engraving) (it is not possible to do otherwise).
let it dry for one day .
wrap tighly a soft cotton cloth on a small flat bit of plank (three or four layers ) , put some white polish
on the cloth , rub the engraved surface of the button on the flat surface of the cloth .
this will remove the white paint on the surface of the button , but not inside the engraving .
I used the same procedure to restore the white numbers on the top of the fork ) (spring preload) .
When done , wash the buttons in washing up liquid ,
and reasemble everything ..
