My project (1GE)

Got a customizing or restoration project? Post your progress pictures and updates here

Moderator: rztom

Message
Author
User avatar
Speed Freak
- - - - -
- - - - -
Posts: 930
Joined: Sun Oct 28, 2012 6:38 pm
Location: Voitsberg, Austria

Re: My project (1GE)

#31 Post by Speed Freak » Tue Dec 30, 2014 5:13 pm

Finished some more parts today:
Image

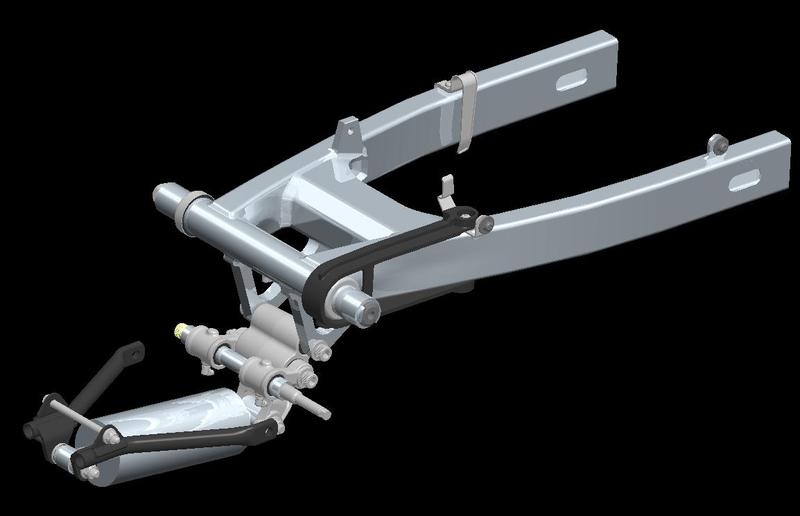
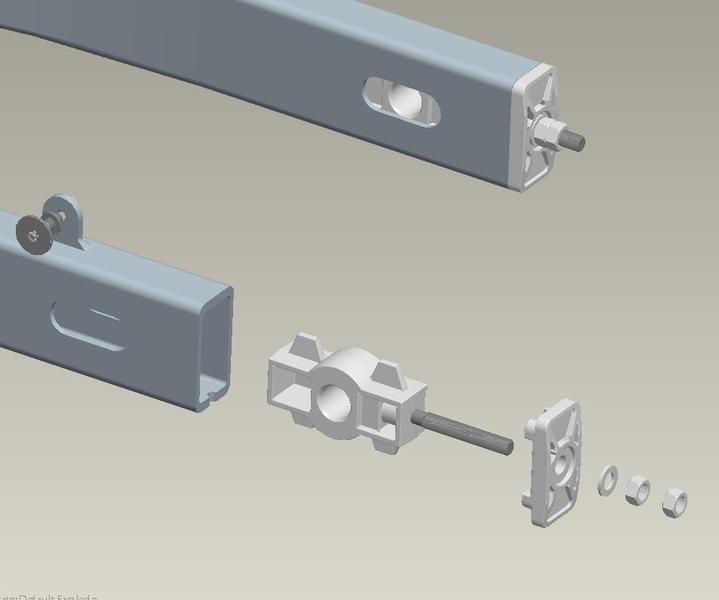
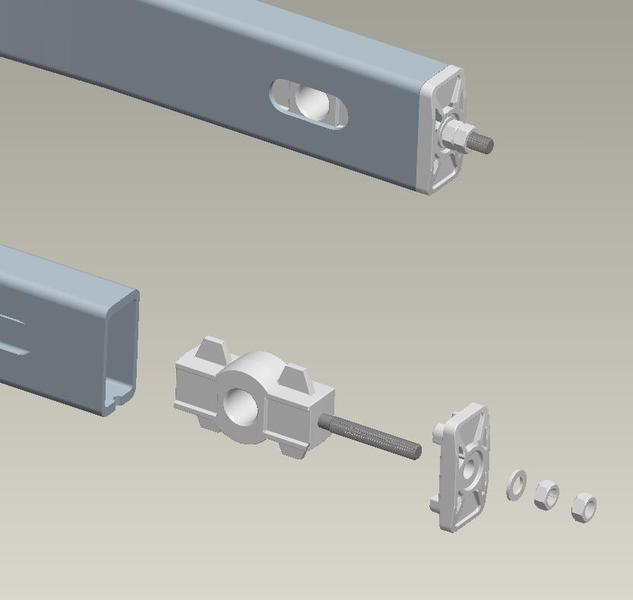
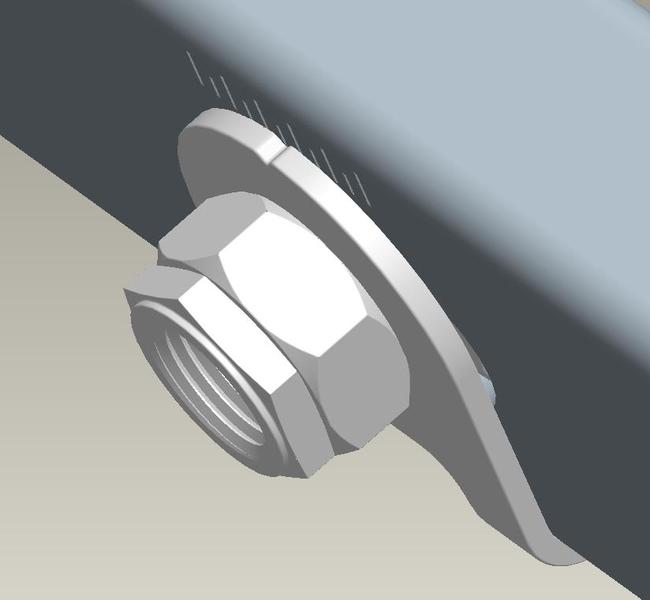
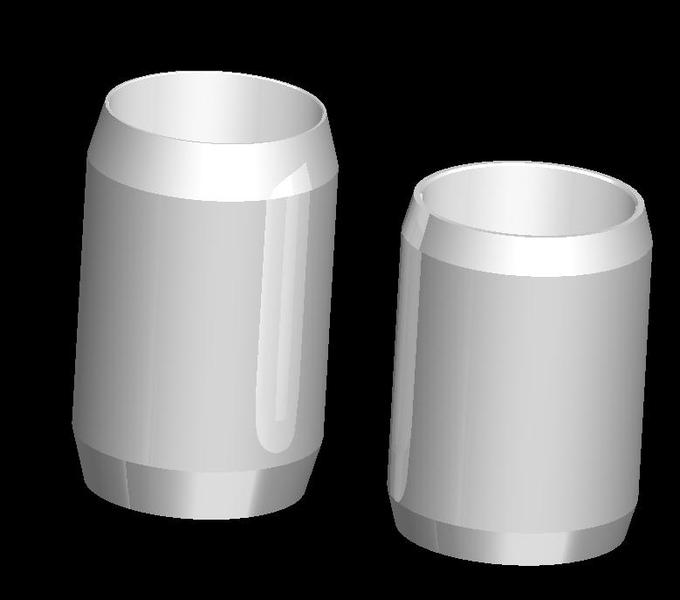
It`s my plan to get every (small) part into CAD to check for alternatives (standard parts) or compare in case Yamaha has changed the part number.

One example 91810-03014 (left), Yamaha changed it to 99510-10114 (right):
Image


I have also done some work in "real life".
My stud bolt removers arrived:
Image and Image

Hazet:
Not possible to remove the stud bolts and it destroys the thread totally.
This tool is maybe ok for mounting stud bolts to be faster, but it`s not really possible to get torque on it without damage on the thread.

Stahlwille:
Not cheap (130€) but worth the money. Tried to get 3 really rusty stud bolts out - no problem without any tricks like heat!
You can put bend free torque on the stud bolt and it is a rigid connection.
On the picture it looks small, but in reality it is massive, the big hexagon is 36 or 38mm.
But there are also marks in the thread after using it. In worst case it would be possible to reuse the stud bolts.
My plan is to take a pipe and cut a thread in it, then make a cut on the side and clamp it with the stahlwille tool onto the stud bolt - hopefully i will get the stud bolts out without damage.

After 15min in the garage i decided to leave... -10° is too cold to work :smt005
My bikes:
RD500 YPVS 1GE
RD350 YPVS 31K 1985
Honda CBR 1000 RR SC57
Yamaha R1 RN04

User avatar
two-stroke-brit
Posts: 294
Joined: Wed Jul 24, 2013 11:07 pm
Location: Houston tx

Re: My project (1GE)

#32 Post by two-stroke-brit » Wed Dec 31, 2014 11:38 am

your threaded sleeve idea should work and save damaging the threads :-)
She might not be pretty but always a fun ride !!

rd84
- - - - -
- - - - -
Posts: 1618
Joined: Thu Nov 17, 2005 7:12 am
Location: Leicestershire, UK

Re: My project (1GE)

#33 Post by rd84 » Wed Dec 31, 2014 4:03 pm

Try the locknut style stud remover / installer - it's like using two locked nuts - but works over a larger area - these seemed to cause little or no damage.

Cheers
Paul

rd84
- - - - -
- - - - -
Posts: 1618
Joined: Thu Nov 17, 2005 7:12 am
Location: Leicestershire, UK

Re: My project (1GE)

#34 Post by rd84 » Wed Dec 31, 2014 4:04 pm

So - are you going to get some of those chain protectors 3D printed in black nylon ? - would be a nice project for you !?

Cheers
Paul

User avatar
Speed Freak
- - - - -
- - - - -
Posts: 930
Joined: Sun Oct 28, 2012 6:38 pm
Location: Voitsberg, Austria

Re: My project (1GE)

#35 Post by Speed Freak » Wed Dec 31, 2014 5:07 pm

Nylon is too hard, would be loud when the chain slides over it.

I have replaced the chain slider of my CBR1000 last year, and there are letters on it: "PUR" - polyurethane.
I want to ask a rapid prototyping company if they can vacuum cast it.
Hopefully it`s not expensive.

But i would preferre a new original part for making the mold, not my CAD part, it`s too inaccurate.
Anyone here who owns a new or nearly new chain slider? :mrgreen:


Regarding the 2 nut stud bolt removing method - i have tried it several times.
Sometimes it works but most of the time it`s not possible to tighten them more against each other without damaging the thread and they just turn together without turning the stud bolt.
I think with the threaded sleeve (full thread length if necessary) it will work perfect.

And the status today, some more brackets, the whole shock absorber assembly finished but the shock absorber itself is just a dummy model at the moment:
Image
My bikes:
RD500 YPVS 1GE
RD350 YPVS 31K 1985
Honda CBR 1000 RR SC57
Yamaha R1 RN04

User avatar
Speed Freak
- - - - -
- - - - -
Posts: 930
Joined: Sun Oct 28, 2012 6:38 pm
Location: Voitsberg, Austria

Re: My project (1GE)

#36 Post by Speed Freak » Thu Jan 01, 2015 6:51 am

Which one is correct, picture 1 or 2?
Can`t find anything about it in the service manual.

I guess the second one is correct, otherwise it would look stupid if the chain tensioner is at the end of the adjusting range (then it would be possible to see the big grooves thru the slot hole in the swing arm)

Image

Image

Edit:
Small nut like on the picture or the other way around?
Image
My bikes:
RD500 YPVS 1GE
RD350 YPVS 31K 1985
Honda CBR 1000 RR SC57
Yamaha R1 RN04

User avatar
Speed Freak
- - - - -
- - - - -
Posts: 930
Joined: Sun Oct 28, 2012 6:38 pm
Location: Voitsberg, Austria

Re: My project (1GE)

#37 Post by Speed Freak » Mon Jan 05, 2015 12:07 pm

Some more work done...

Real work:
Disassembled the wheels of my spare parts bike (the pink and green high quality painted bike - even the wheel bearing cages where painted :smt005 )
They will get new paint, new bearings and oil seals, the other wheel set will be stored as it is (original and good condition).
It is horrible to remove ~20 year old tires with my prototype hand driven tire remover :smt013
Even if V1 is doing it`s job since 3 years, i have to build a second better version...
At least it doesn`t felt that cold in the garage.

Now i have all specs of the wheel bearings and can order them.
Hopefully i can find a dealer where i get all original bearings.


On the digital side there is also progress. Front and rear wheel are nearly finished, just the rims are missing.
And today i wanted to continue - my laptop tells me "cant find system data XXX, not able to start windows" :smt013
=> Today`s work: Trying to fix my laptop! But i got all data onto another harddisk.
My bikes:
RD500 YPVS 1GE
RD350 YPVS 31K 1985
Honda CBR 1000 RR SC57
Yamaha R1 RN04

User avatar
jackson.40
*****
*****
Posts: 2328
Joined: Fri Dec 30, 2005 7:01 pm
Location: Cambridge,UK

Re: My project (1GE)

#38 Post by jackson.40 » Tue Jan 06, 2015 7:20 am

Speed Freak wrote
Edit:
Small nut like on the picture or the other way around?
Small nut to the outside as per the picture :cool:

User avatar
Speed Freak
- - - - -
- - - - -
Posts: 930
Joined: Sun Oct 28, 2012 6:38 pm
Location: Voitsberg, Austria

Re: My project (1GE)

#39 Post by Speed Freak » Tue Jan 06, 2015 10:45 am

Thanks, then i will keep it as it is.

I decided to take a golden D.I.D chain :cool:
Image

And maybe interesting to see how it looks like inside of the front wheel assembly
Image
My bikes:
RD500 YPVS 1GE
RD350 YPVS 31K 1985
Honda CBR 1000 RR SC57
Yamaha R1 RN04

PilotMarky
Posts: 70
Joined: Mon Aug 25, 2014 10:52 pm
Location: Detroit, MI
Contact:

Re: My project (1GE)

#40 Post by PilotMarky » Mon Jan 19, 2015 11:18 am

Speed Freak, you are one crazy dude putting all that into CAD!!! No doubt it will be a huge help to people when you have it complete.

I too have just started a restoration... I am in the US, and have an RZ in pretty good shape. Frame is at paint shop, cylinders are at Lance Gamma for a reconditioning. Picking up ground and replated fork tubes today..

Will be watching your progress... I am going to make a page on my website soon to document the build.. Will post soon the location.

Cheers!

Mark.
Mark

PilotMarky
Posts: 70
Joined: Mon Aug 25, 2014 10:52 pm
Location: Detroit, MI
Contact:

Re: My project (1GE)

#41 Post by PilotMarky » Mon Jan 19, 2015 11:19 am

Oh also, what system are you using? I use CATIA V5.
Mark

User avatar
Speed Freak
- - - - -
- - - - -
Posts: 930
Joined: Sun Oct 28, 2012 6:38 pm
Location: Voitsberg, Austria

Re: My project (1GE)

#42 Post by Speed Freak » Mon Jan 19, 2015 12:44 pm

Hi Mark,

i`m using Pro/Engineer WF4.
There is not really much progress in the last 2 weeks because my holidays are over and i`m usually not really motivated to start my laptop in the evening after 8-9h Catia :mrgreen:

If your RZ is in a good shape/original you maybe can help me.
I would need pictures of the original bolts used for mounting the ignition coil brackets to the frame (upper and lower).

The upper one should be mounted with a yellow zinc hexagon head bolt, spring washer and washer, the lower one should be mounted with a olive zinc cross slot head bolt + spring washer + washer.
Washers should not be removable from the bolt.
For the upper one i would also need the dimensions (and colors) of the washers, for the lower one i already got everything, but i`m also happy to get this information from some different sources.

At the moment i`m a little bit confused about the spring washer used on the bolt for the upper ignition coil bracket.
I have it already in the system because it is also used on the swing arm, but there it is silver zinc.
On the ignition coil bolt assembly i expect that it is yellow zinc (This bolt is missing on my bike).
Maybe the washers just have one number and they get the color of the bolt when they are used.
My bikes:
RD500 YPVS 1GE
RD350 YPVS 31K 1985
Honda CBR 1000 RR SC57
Yamaha R1 RN04

User avatar
Speed Freak
- - - - -
- - - - -
Posts: 930
Joined: Sun Oct 28, 2012 6:38 pm
Location: Voitsberg, Austria

Re: My project (1GE)

#43 Post by Speed Freak » Mon Jan 19, 2015 4:48 pm

I guess i had a cleaner that removed the yellow plating from some parts (acid)...

Can someone confirm that the bolt and washer in the picture is plated with yellow zinc?
Image

I hope it is correct that the bracket is silver.

Thanks
My bikes:
RD500 YPVS 1GE
RD350 YPVS 31K 1985
Honda CBR 1000 RR SC57
Yamaha R1 RN04

User avatar
jackson.40
*****
*****
Posts: 2328
Joined: Fri Dec 30, 2005 7:01 pm
Location: Cambridge,UK

Re: My project (1GE)

#44 Post by jackson.40 » Mon Jan 19, 2015 5:42 pm

Screw and washer are bright zinc.

Steve

User avatar
Speed Freak
- - - - -
- - - - -
Posts: 930
Joined: Sun Oct 28, 2012 6:38 pm
Location: Voitsberg, Austria

Re: My project (1GE)

#45 Post by Speed Freak » Mon Jan 19, 2015 7:01 pm

Thanks Steve,

checked the bolt on the power valve rod bracket (same bolt used without spring washer) - it`s also silver there.
But i guess the spring washer is yellow in the bolt assembly that holds the upper ignition coil bracket.


Today there was a little bit of motivation left:
Image

The plain washer is not captive, found the whole assembly how it is shown on 2 bikes coming from totally different owners ;)
My bikes:
RD500 YPVS 1GE
RD350 YPVS 31K 1985
Honda CBR 1000 RR SC57
Yamaha R1 RN04

Post Reply