Interesting. I didn't think to locate the tee back there by the valve. Thanks for sharing Olli. Its good to know there's an option to go back to the fan set-up and keep the filters in place (I have the fan already, just in case). And thanks for "stopping in"!Motolli wrote: ↑Fri Dec 21, 2018 6:30 am Great! I use the same configuration of the fuel hoses incl the two filters on a stock radiator. I installed the t- piece near the fuel valve to have longer hoses towards the carbs. Then you can lead them around in a smooth radius around and between the fan and stock radiator hoses
Olli
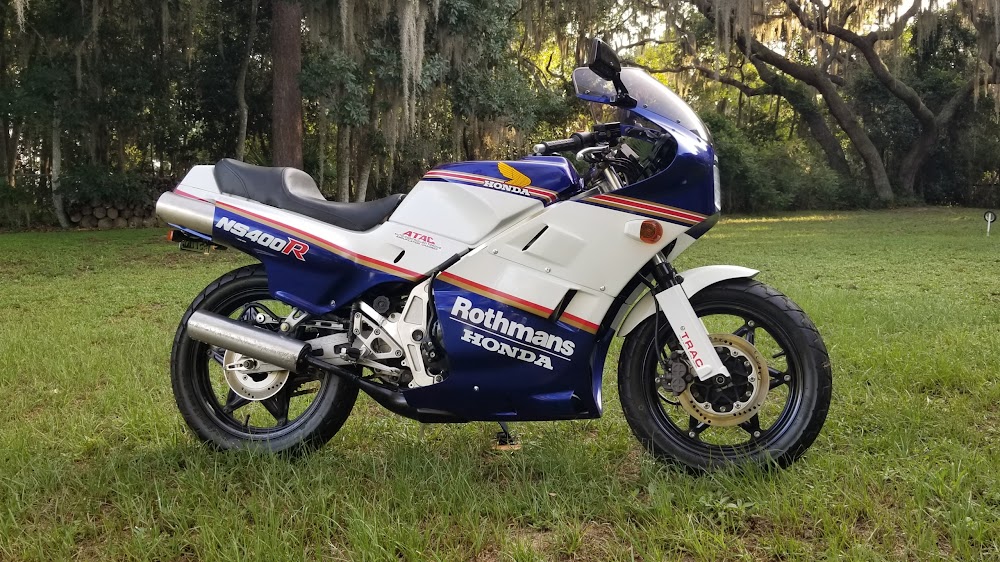
Operation: MOSQUITO CONTROL BIKE - Florida RZ500 Project (52X)
Moderator: rztom
-
TwoStrokeNut
- Posts: 585
- Joined: Tue Nov 20, 2012 5:12 pm
- Location: Florida,USA
Re: Operation: MOSQUITO CONTROL BIKE - Florida RZ500 Project
Project bike links: NS400R - TRIPLE THREAT // RZ500 - MOSQUITO CONTROL BIKE // RZ350 - REVIVAL
'72 H1-500/'75 H1-500/'85 RZ350/'85 NS400R/'01 DR650/'07 FJR1300/'18 Tiger 1200
'72 H1-500/'75 H1-500/'85 RZ350/'85 NS400R/'01 DR650/'07 FJR1300/'18 Tiger 1200
-
TwoStrokeNut
- Posts: 585
- Joined: Tue Nov 20, 2012 5:12 pm
- Location: Florida,USA
Re: Operation: MOSQUITO CONTROL BIKE - Florida RZ500 Project
Thanks! And the object here is keep the price not too objectionable. LOL Who knows what an OEM tail light is going for these days... the prices seem to have skyrocketed since I was last tinkering on this bike 4 years ago. I guess that is good for resale value (although, I don't really intend to sell this bike).lost1750GTV wrote: ↑Fri Dec 21, 2018 8:15 am tail lights look really good, amazing what you can do when price is not an object.
That reminds me... I forgot to show the final picture of the tail.
Project bike links: NS400R - TRIPLE THREAT // RZ500 - MOSQUITO CONTROL BIKE // RZ350 - REVIVAL
'72 H1-500/'75 H1-500/'85 RZ350/'85 NS400R/'01 DR650/'07 FJR1300/'18 Tiger 1200
'72 H1-500/'75 H1-500/'85 RZ350/'85 NS400R/'01 DR650/'07 FJR1300/'18 Tiger 1200
-
TwoStrokeNut
- Posts: 585
- Joined: Tue Nov 20, 2012 5:12 pm
- Location: Florida,USA
Re: Operation: MOSQUITO CONTROL BIKE - Florida RZ500 Project
Service E06/E07 – Brake and Tail Light, plus Wiring...
The last I showed on this topic was a painted rear tail light mount bracket, but I never showed the final result with everything all back together. My intention here was to install a new tail light and tidy everything up back there, and I think I achieved what I set out to do. I was hoping things would just sort of disappear under the bodywork with the new black color.
Picture 400

E06/E07 Total Cost: US$0.00 (follow-up picture only)
The last I showed on this topic was a painted rear tail light mount bracket, but I never showed the final result with everything all back together. My intention here was to install a new tail light and tidy everything up back there, and I think I achieved what I set out to do. I was hoping things would just sort of disappear under the bodywork with the new black color.
Picture 400
E06/E07 Total Cost: US$0.00 (follow-up picture only)
Project bike links: NS400R - TRIPLE THREAT // RZ500 - MOSQUITO CONTROL BIKE // RZ350 - REVIVAL
'72 H1-500/'75 H1-500/'85 RZ350/'85 NS400R/'01 DR650/'07 FJR1300/'18 Tiger 1200
'72 H1-500/'75 H1-500/'85 RZ350/'85 NS400R/'01 DR650/'07 FJR1300/'18 Tiger 1200
-
TwoStrokeNut
- Posts: 585
- Joined: Tue Nov 20, 2012 5:12 pm
- Location: Florida,USA
Re: Operation: MOSQUITO CONTROL BIKE - Florida RZ500 Project
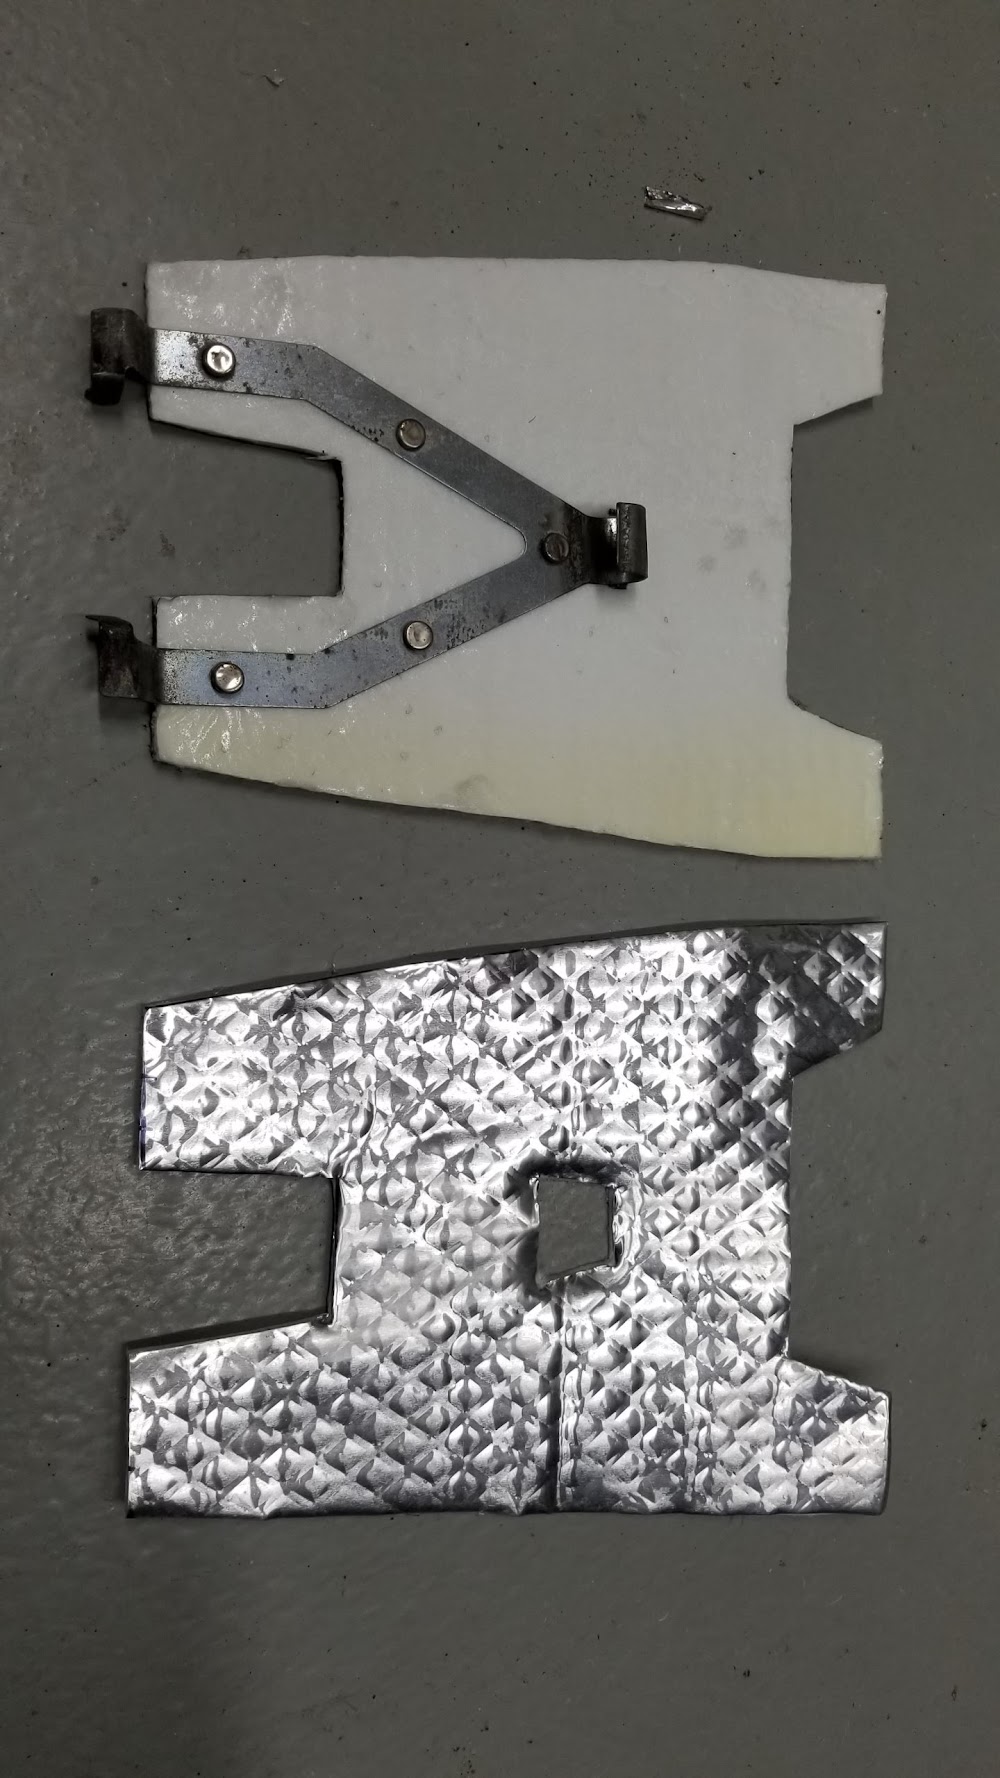
Service C03 - Head Shields...
To deal with the exhaust heat from the upper chambers, there were several things that needed to be done and all involved using some of that adhesive-backed heat shield material I bought for the battery box. I needed to re-apply material to the seat and tank heat shields, as well as apply pieces on the inside of the tail section where the chambers touch.
Here is was the seat and tank shields looked like before. It appears the tank shield aluminum flange on the front left has been trimmed off for some reason, probably fuel line clearance.
Picture 401

Picture 402

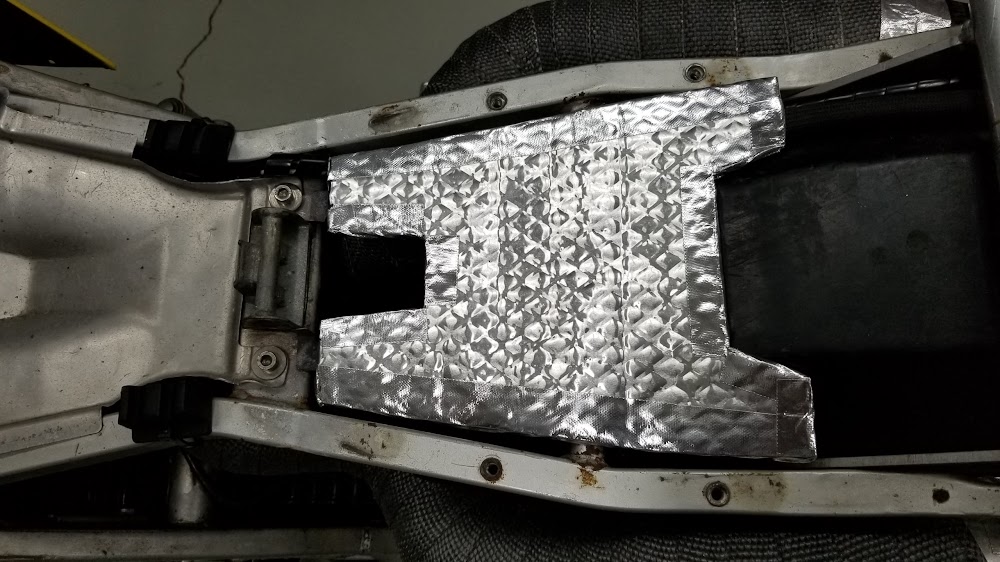
I re-constructed the rear shield completely by making a template, cutting out two sheets and applying the material back-to-back. One needed a hole for the frame hook to pass through. I then sealed the edges with high heat tape.
Picture 403

Picture 404
Picture 405

Picture 406

Here is the rear shield installed.
Picture 407
And the front.
Picture 408

The tail piece needed 4 spots protected from the expansion chamber heat. When I first got the bike and took it for a short spin, I remember the side bodywork getting so hot I couldn’t touch it. I was amazed that the paint had not burned.
Picture 409
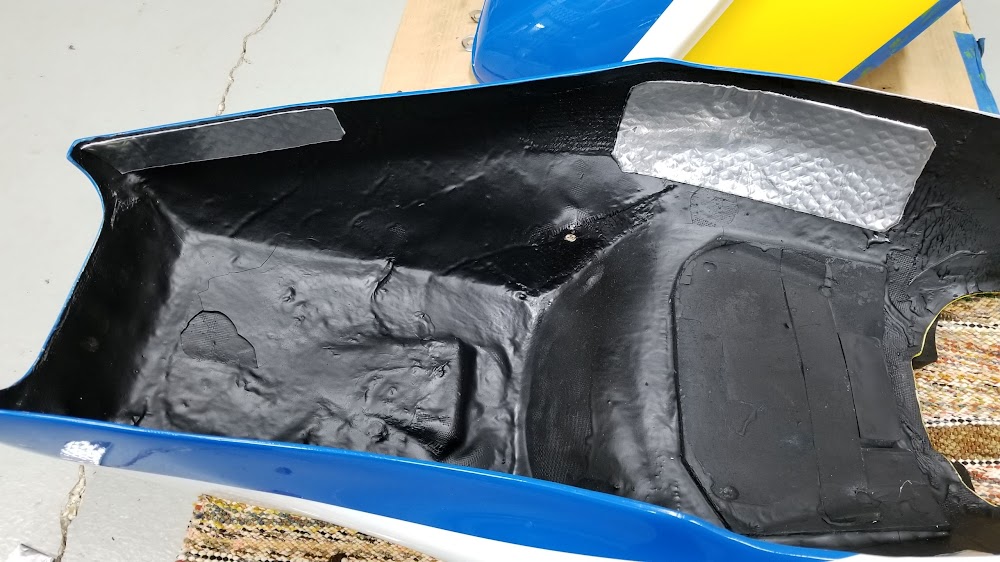
Picture 410

I know I accounted for some of this material earlier, but I used some of the thicker material this time as well, let’s say US$20.00 to cover the small pieces I used.
C03 Total Cost: US$20.00 (Adhesive backed heat shield material)
To deal with the exhaust heat from the upper chambers, there were several things that needed to be done and all involved using some of that adhesive-backed heat shield material I bought for the battery box. I needed to re-apply material to the seat and tank heat shields, as well as apply pieces on the inside of the tail section where the chambers touch.
Here is was the seat and tank shields looked like before. It appears the tank shield aluminum flange on the front left has been trimmed off for some reason, probably fuel line clearance.
Picture 401
Picture 402
I re-constructed the rear shield completely by making a template, cutting out two sheets and applying the material back-to-back. One needed a hole for the frame hook to pass through. I then sealed the edges with high heat tape.
Picture 403
Picture 404
Picture 405
Picture 406
Here is the rear shield installed.
Picture 407
And the front.
Picture 408
The tail piece needed 4 spots protected from the expansion chamber heat. When I first got the bike and took it for a short spin, I remember the side bodywork getting so hot I couldn’t touch it. I was amazed that the paint had not burned.
Picture 409
Picture 410
I know I accounted for some of this material earlier, but I used some of the thicker material this time as well, let’s say US$20.00 to cover the small pieces I used.
C03 Total Cost: US$20.00 (Adhesive backed heat shield material)
Project bike links: NS400R - TRIPLE THREAT // RZ500 - MOSQUITO CONTROL BIKE // RZ350 - REVIVAL
'72 H1-500/'75 H1-500/'85 RZ350/'85 NS400R/'01 DR650/'07 FJR1300/'18 Tiger 1200
'72 H1-500/'75 H1-500/'85 RZ350/'85 NS400R/'01 DR650/'07 FJR1300/'18 Tiger 1200
-
TwoStrokeNut
- Posts: 585
- Joined: Tue Nov 20, 2012 5:12 pm
- Location: Florida,USA
Re: Operation: MOSQUITO CONTROL BIKE - Florida RZ500 Project
Installing seat pan and tail piece bodywork...
Now that the rear heat shield was finished and installed, it was time to re-install the seat pan. The aluminum plate just provides a foundation for the fiberglass tail piece to rest on.
Picture 411
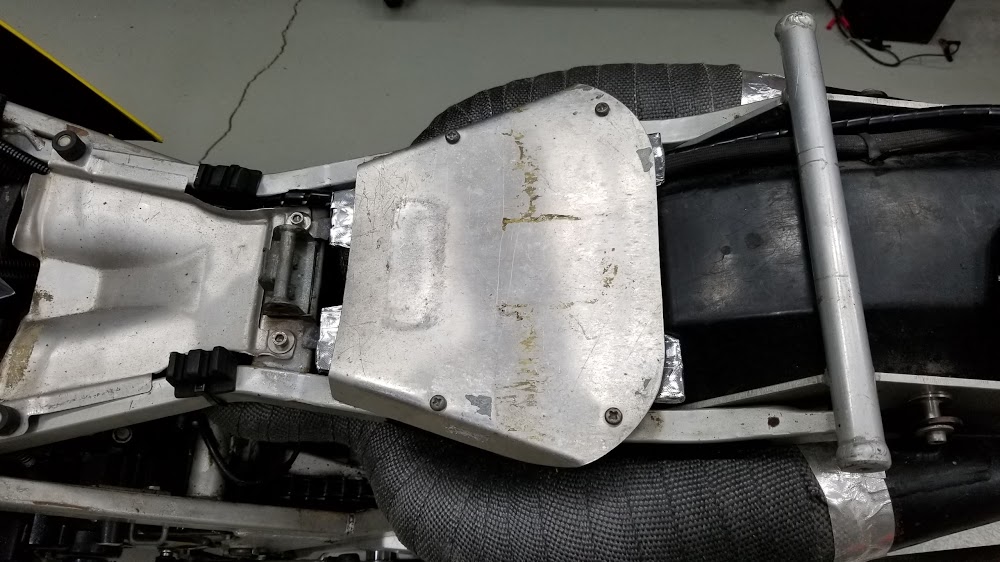
And then the tail bodywork could go back on. It was a tighter fit with all the extra heat shielding. Although not installed yet in these pictures, I added the bushing under the mounting screws to protect the fiberglass like I have shown on the front fairing.
Picture 412

Picture 413

Boy, it sure is nice to see this bike come back together after all these years!
Now that the rear heat shield was finished and installed, it was time to re-install the seat pan. The aluminum plate just provides a foundation for the fiberglass tail piece to rest on.
Picture 411
And then the tail bodywork could go back on. It was a tighter fit with all the extra heat shielding. Although not installed yet in these pictures, I added the bushing under the mounting screws to protect the fiberglass like I have shown on the front fairing.
Picture 412
Picture 413
Boy, it sure is nice to see this bike come back together after all these years!
Project bike links: NS400R - TRIPLE THREAT // RZ500 - MOSQUITO CONTROL BIKE // RZ350 - REVIVAL
'72 H1-500/'75 H1-500/'85 RZ350/'85 NS400R/'01 DR650/'07 FJR1300/'18 Tiger 1200
'72 H1-500/'75 H1-500/'85 RZ350/'85 NS400R/'01 DR650/'07 FJR1300/'18 Tiger 1200
-
TwoStrokeNut
- Posts: 585
- Joined: Tue Nov 20, 2012 5:12 pm
- Location: Florida,USA
Re: Operation: MOSQUITO CONTROL BIKE - Florida RZ500 Project
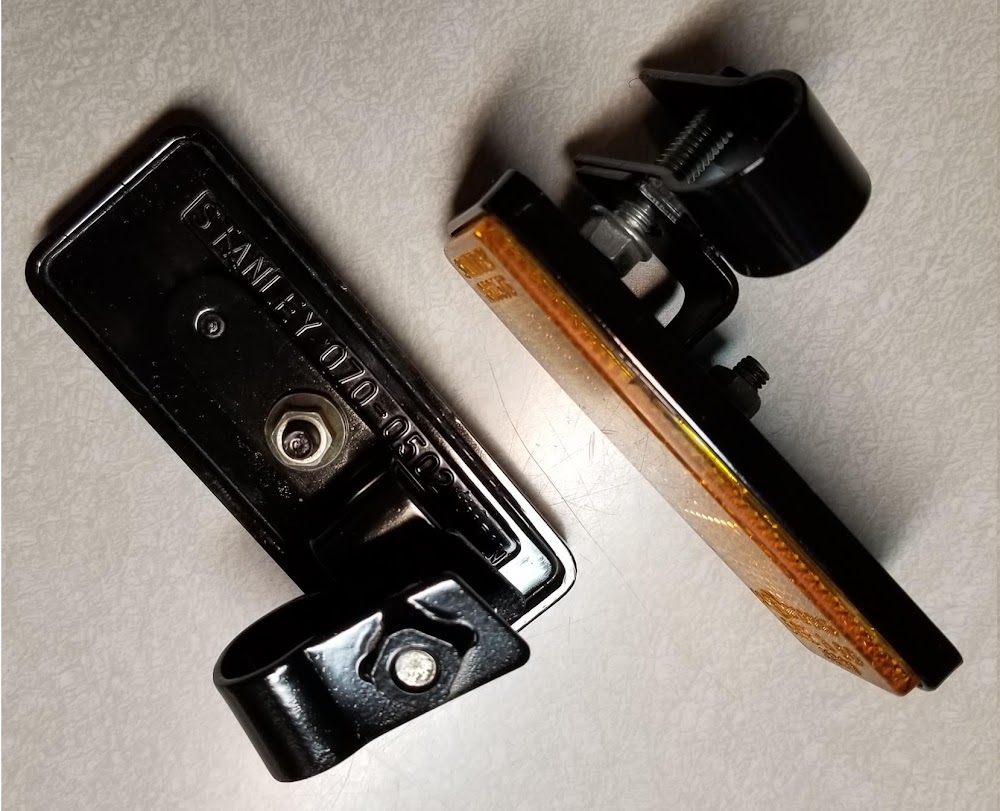
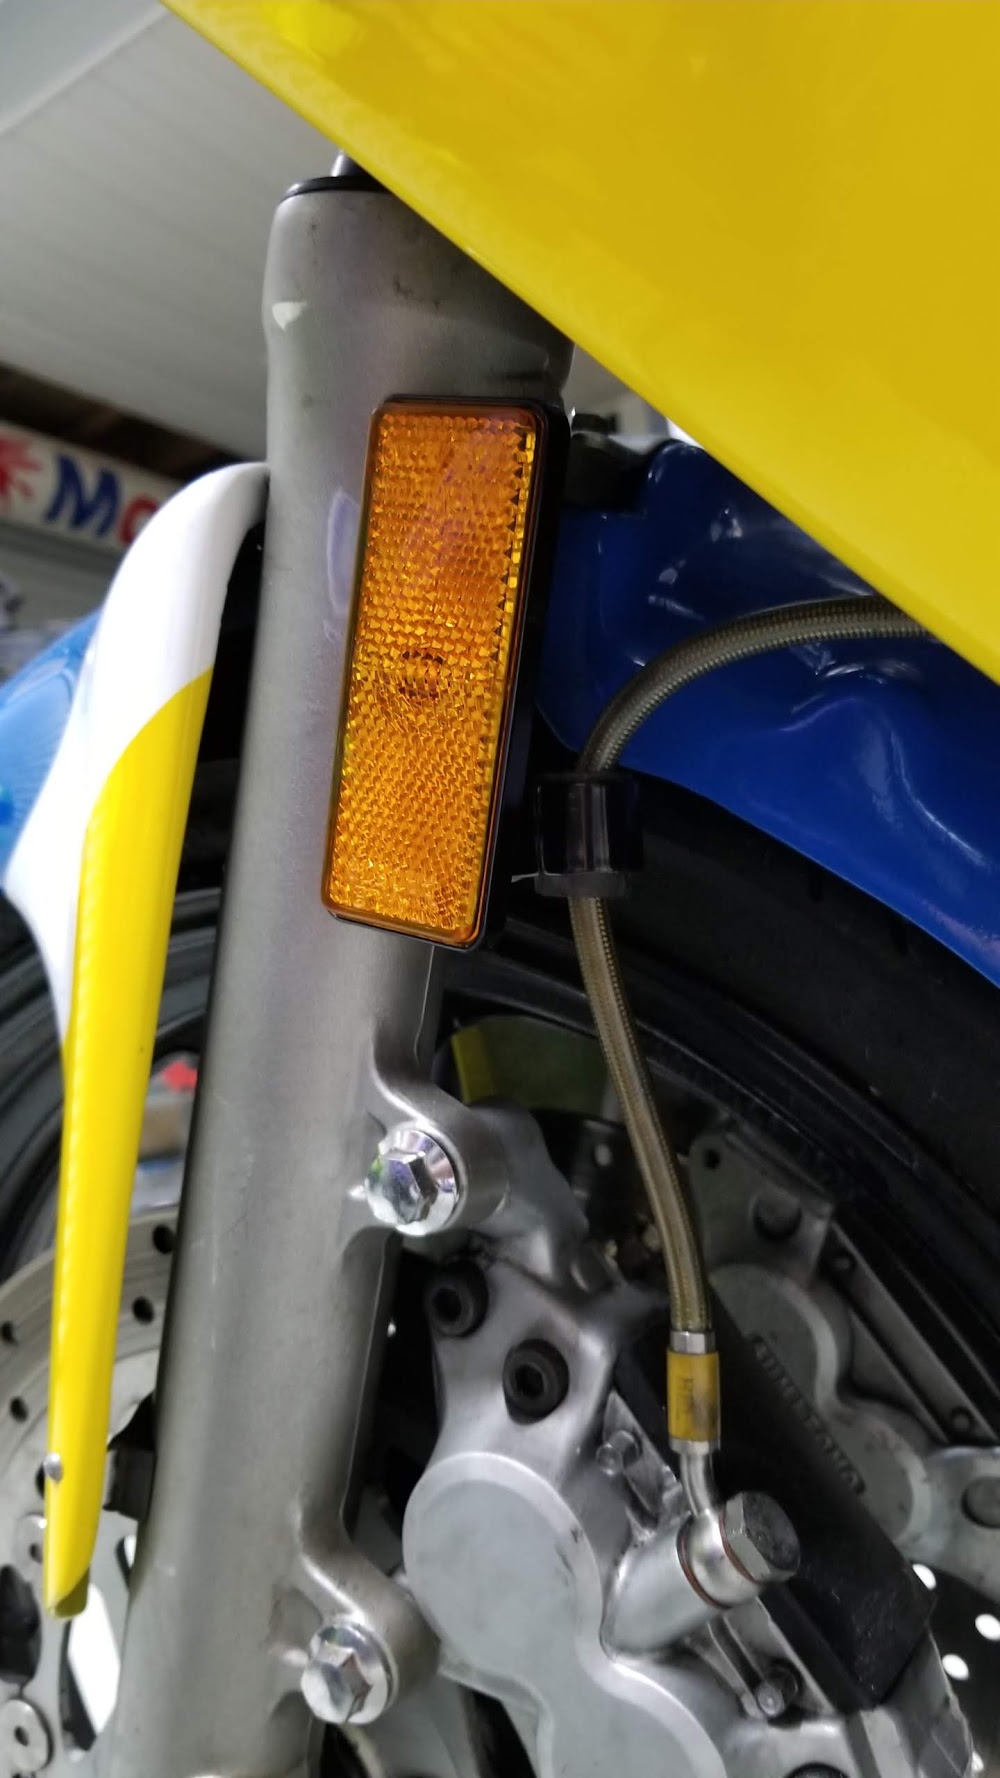
Service C32 – Front brake hose guides, and Reflectors (Part 1 of 2)...
Call me crazy, but I just don’t like my hoses flapping in the breeze. And cable ties just don’t have that finished look.
Picture 414

So I sought out some original FZR600 brake hose guides and reflectors to match these forks and found these for US$15.00.
Picture 415

Of course, most old bike parts on ebay will need a good cleaning and perhaps paint, and that is what they got.
Picture 416
Here they are, installed.
Picture 417
Picture 418
Picture 419

Picture 420
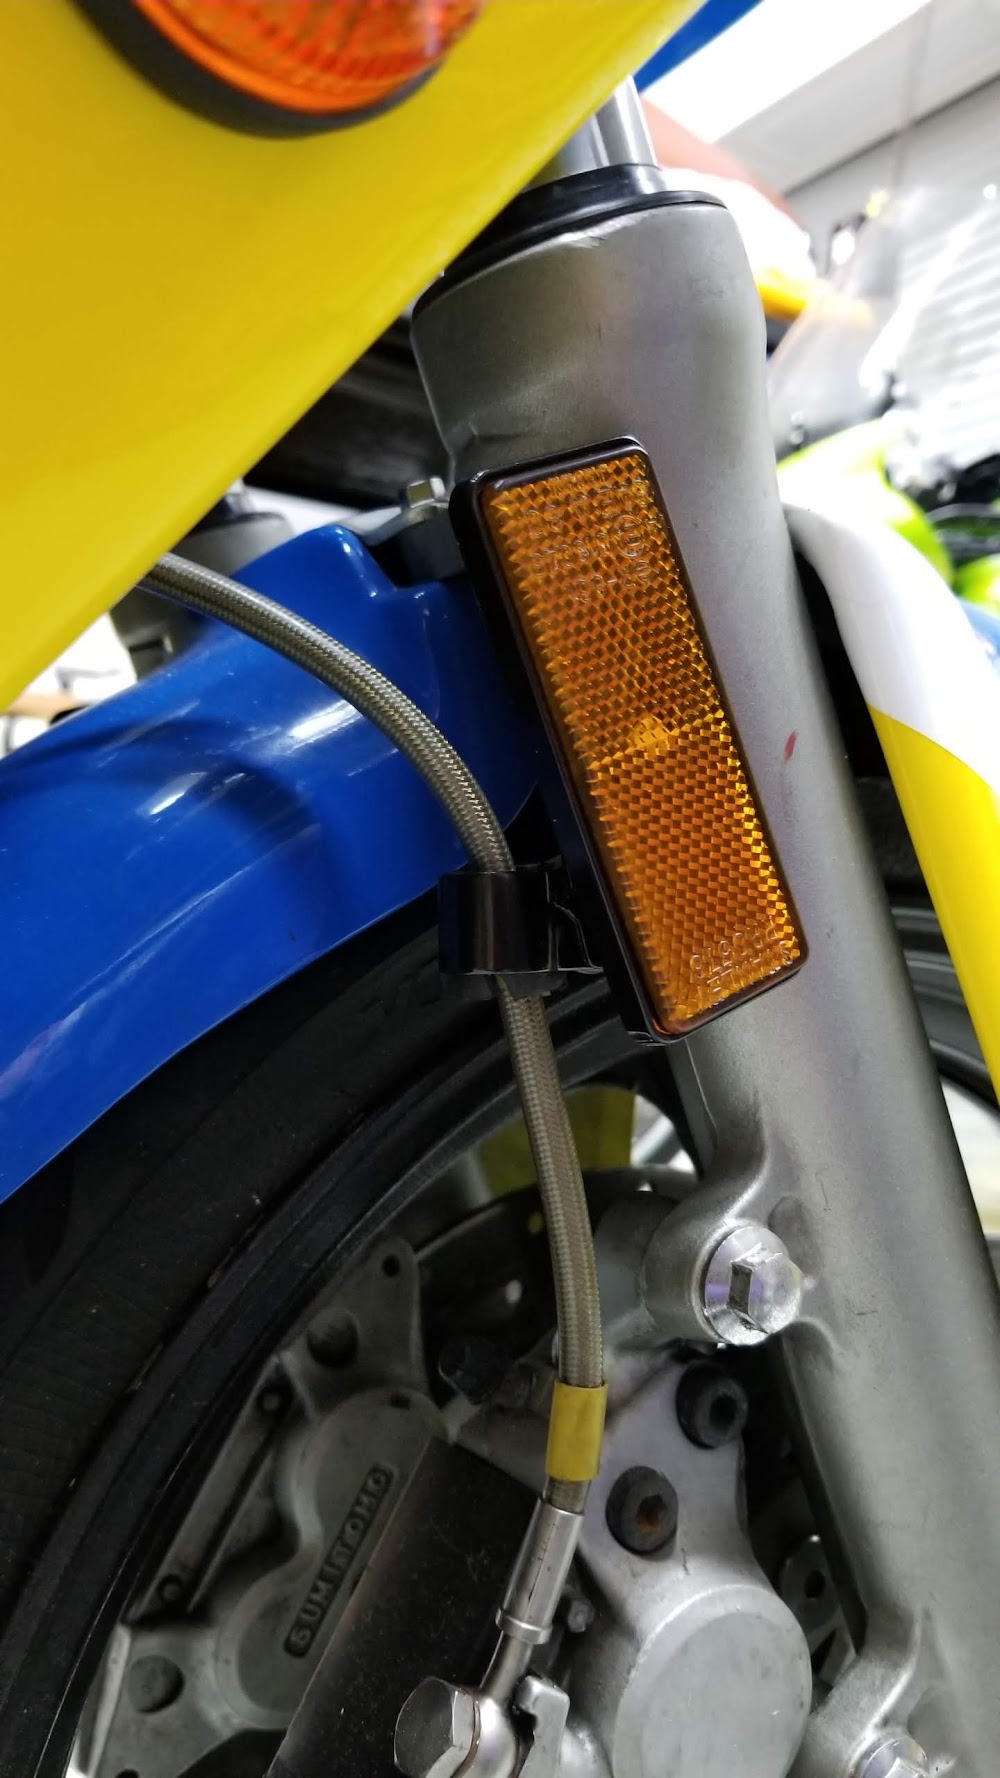
Some may question the need for reflectors on a bike like this (if originally import into the USA, it would have come from the factory that way!), but I think it finishes it off nicely and a little extra safety couldn’t hurt.
C32 Total Cost: US$15.00 (FZR600 hose clamps and reflectors)
Call me crazy, but I just don’t like my hoses flapping in the breeze. And cable ties just don’t have that finished look.
Picture 414
So I sought out some original FZR600 brake hose guides and reflectors to match these forks and found these for US$15.00.
Picture 415
Of course, most old bike parts on ebay will need a good cleaning and perhaps paint, and that is what they got.
Picture 416
Here they are, installed.
Picture 417
Picture 418
Picture 419
Picture 420
Some may question the need for reflectors on a bike like this (if originally import into the USA, it would have come from the factory that way!), but I think it finishes it off nicely and a little extra safety couldn’t hurt.
C32 Total Cost: US$15.00 (FZR600 hose clamps and reflectors)
Last edited by TwoStrokeNut on Wed Dec 26, 2018 1:01 am, edited 1 time in total.
Project bike links: NS400R - TRIPLE THREAT // RZ500 - MOSQUITO CONTROL BIKE // RZ350 - REVIVAL
'72 H1-500/'75 H1-500/'85 RZ350/'85 NS400R/'01 DR650/'07 FJR1300/'18 Tiger 1200
'72 H1-500/'75 H1-500/'85 RZ350/'85 NS400R/'01 DR650/'07 FJR1300/'18 Tiger 1200
-
TwoStrokeNut
- Posts: 585
- Joined: Tue Nov 20, 2012 5:12 pm
- Location: Florida,USA
Re: Operation: MOSQUITO CONTROL BIKE - Florida RZ500 Project
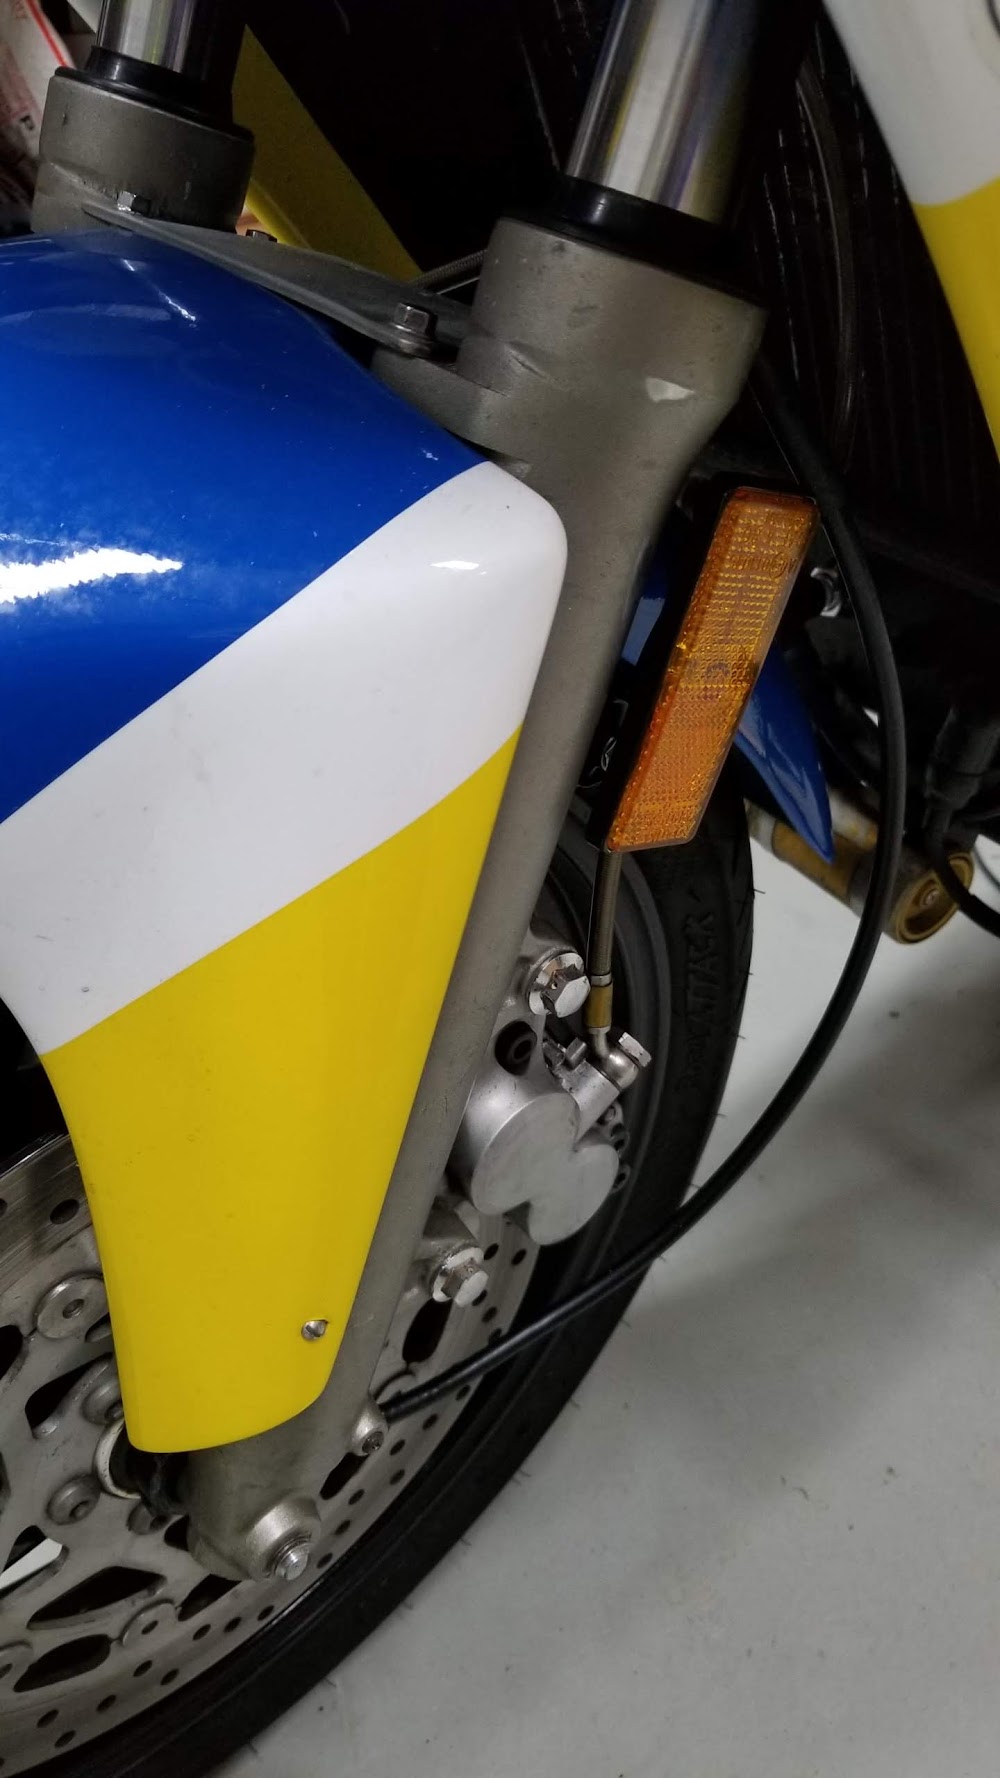
Service C33 – Speedometer cable guide...
Again, just letting cables flop around is poor practice and just looks unfinished to me. The front fender had a boss molded in it for some sort of speedometer cable guide.
Picture 421

I found Yamaha part 1A8-21518-00 to work with it. It is more flexible than I imagined, but I guess it has to be to allow it to insert in the fender hole.
Picture 422

Here it is, installed.
Picture 423

EDIT: Here is a final shot with the guide painted black
Picture 480

C33 Total Cost: US$5.00 (Yamaha speedo cable guide)
Again, just letting cables flop around is poor practice and just looks unfinished to me. The front fender had a boss molded in it for some sort of speedometer cable guide.
Picture 421
I found Yamaha part 1A8-21518-00 to work with it. It is more flexible than I imagined, but I guess it has to be to allow it to insert in the fender hole.
Picture 422
Here it is, installed.
Picture 423
EDIT: Here is a final shot with the guide painted black
Picture 480
C33 Total Cost: US$5.00 (Yamaha speedo cable guide)
Last edited by TwoStrokeNut on Mon Jan 21, 2019 7:20 pm, edited 1 time in total.
Project bike links: NS400R - TRIPLE THREAT // RZ500 - MOSQUITO CONTROL BIKE // RZ350 - REVIVAL
'72 H1-500/'75 H1-500/'85 RZ350/'85 NS400R/'01 DR650/'07 FJR1300/'18 Tiger 1200
'72 H1-500/'75 H1-500/'85 RZ350/'85 NS400R/'01 DR650/'07 FJR1300/'18 Tiger 1200
-
TwoStrokeNut
- Posts: 585
- Joined: Tue Nov 20, 2012 5:12 pm
- Location: Florida,USA
Re: Operation: MOSQUITO CONTROL BIKE - Florida RZ500 Project
Service C32 – Front brake hose guides, and Reflectors (Part 2 of 2)...
Everything up near the gauge cluster is tight. It is essential that brake hoses and throttle cables are routed where they can’t snag on something.
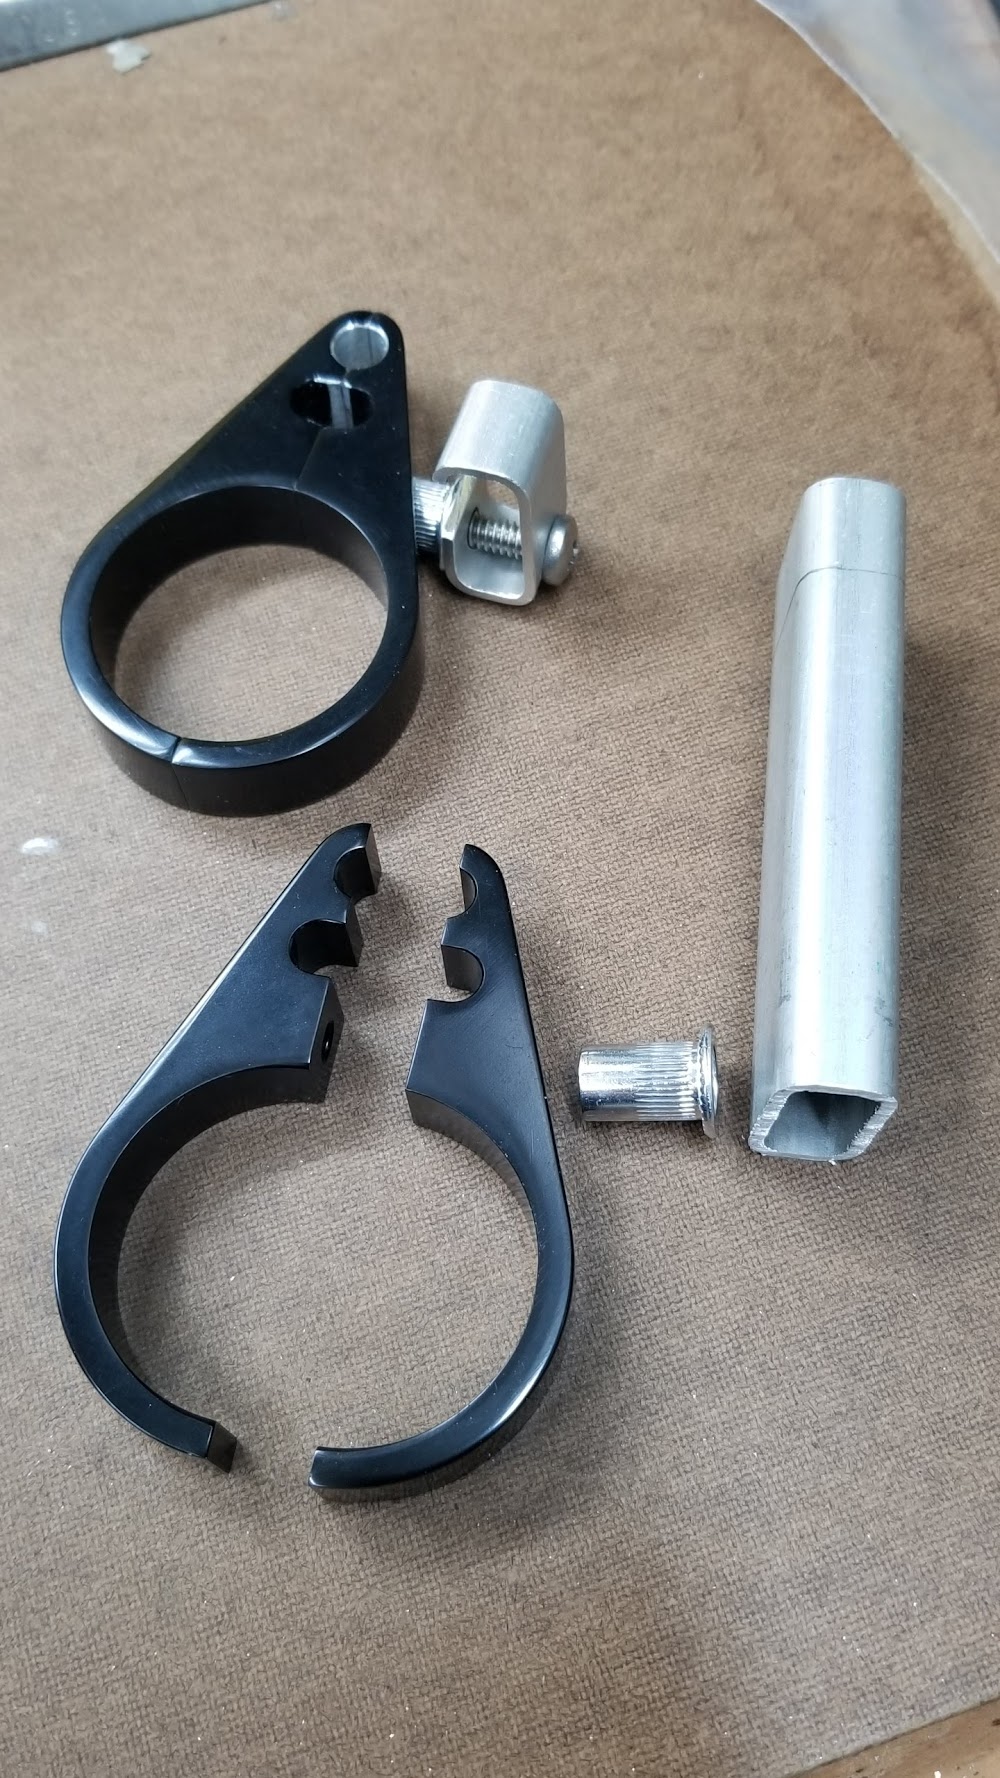
Being Christmas time, my online sellers were offering free shipping deals. After some searching, I found some 38mm clamps on clearance for US$6.00.
Picture 424

I only needed one to the two brake hoses parallel to the fork tube. To constrain the throttle cables horizontally in the same area, I cut a loop from a piece of rectangular aluminum tubing. This shows the assembled clamp before it when on the bike, and example parts that were used to make it. The throttle loop has a slot cut in it to allow installing the cables from the backside.
Picture 425
Here are a couple shots with it installed. I likely will paint the throttle loop black to help it “disappear”. Sorry, it’s hard to see the brake hoses routing through the black bracket.
Picture 426
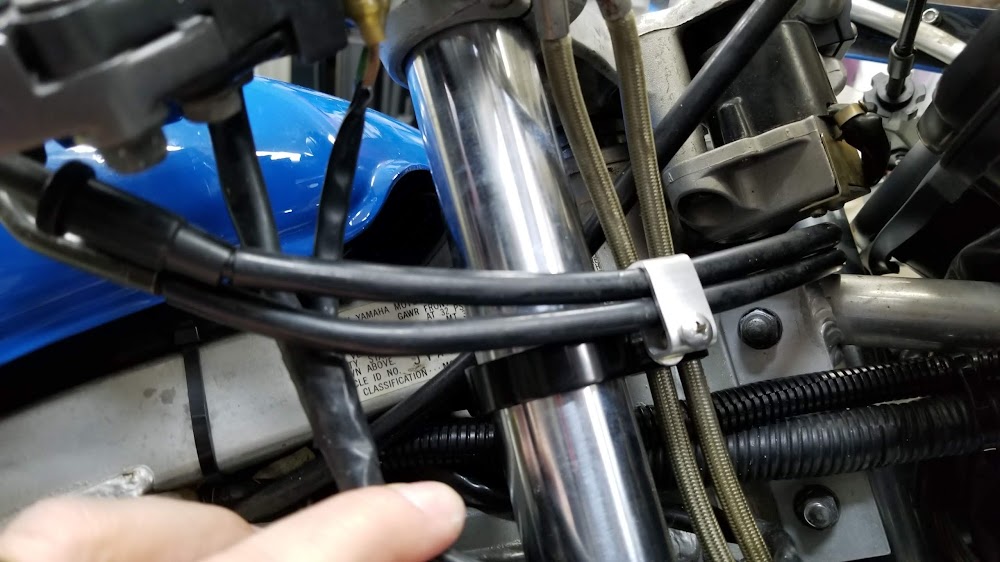
Picture 427

C32 Total Cost: US$6.00 (38mm clamp, aluminum stock and screws from inventory)
Everything up near the gauge cluster is tight. It is essential that brake hoses and throttle cables are routed where they can’t snag on something.
Being Christmas time, my online sellers were offering free shipping deals. After some searching, I found some 38mm clamps on clearance for US$6.00.
Picture 424
I only needed one to the two brake hoses parallel to the fork tube. To constrain the throttle cables horizontally in the same area, I cut a loop from a piece of rectangular aluminum tubing. This shows the assembled clamp before it when on the bike, and example parts that were used to make it. The throttle loop has a slot cut in it to allow installing the cables from the backside.
Picture 425
Here are a couple shots with it installed. I likely will paint the throttle loop black to help it “disappear”. Sorry, it’s hard to see the brake hoses routing through the black bracket.
Picture 426
Picture 427
C32 Total Cost: US$6.00 (38mm clamp, aluminum stock and screws from inventory)
Project bike links: NS400R - TRIPLE THREAT // RZ500 - MOSQUITO CONTROL BIKE // RZ350 - REVIVAL
'72 H1-500/'75 H1-500/'85 RZ350/'85 NS400R/'01 DR650/'07 FJR1300/'18 Tiger 1200
'72 H1-500/'75 H1-500/'85 RZ350/'85 NS400R/'01 DR650/'07 FJR1300/'18 Tiger 1200
-
TwoStrokeNut
- Posts: 585
- Joined: Tue Nov 20, 2012 5:12 pm
- Location: Florida,USA
Re: Operation: MOSQUITO CONTROL BIKE - Florida RZ500 Project
Mirrors...
These CRG mirror came with the bike when I purchased it. They are tiny, but are quality units and actually work satisfactorily so I will keep them on for now.
Picture 428

Picture 429

These CRG mirror came with the bike when I purchased it. They are tiny, but are quality units and actually work satisfactorily so I will keep them on for now.
Picture 428
Picture 429
Project bike links: NS400R - TRIPLE THREAT // RZ500 - MOSQUITO CONTROL BIKE // RZ350 - REVIVAL
'72 H1-500/'75 H1-500/'85 RZ350/'85 NS400R/'01 DR650/'07 FJR1300/'18 Tiger 1200
'72 H1-500/'75 H1-500/'85 RZ350/'85 NS400R/'01 DR650/'07 FJR1300/'18 Tiger 1200
-
TwoStrokeNut
- Posts: 585
- Joined: Tue Nov 20, 2012 5:12 pm
- Location: Florida,USA
Re: Operation: MOSQUITO CONTROL BIKE - Florida RZ500 Project
AFTER BEING IN PIECES FOR 6 YEARS, IT WAS FINALLY TIME FOR A TEST RIDE!!!!!!!...
TEST RIDE #1 (10 miles)
I was looking forward to this day for 6 years. AND, also dreading it at some small level for the potential problems that could ensue. I had quite a few things apart on this bike and any one of them could lead have led to a problem.
As explained earlier, the bike was starting properly on choke and seemed to rev cleanly once warmed up. But this was sitting stationary in front of the shop, and things like brakes, steering, etc. were still unknowns. It restarted on the first kick consistently so my confidence was building as I did the short engine trials.
When I bought the bike six years ago, I rode it a total of about 4 miles before tearing it apart, so I honestly remember very little from that test ride. With a completely foreign bike, the first miles are spent getting familiar with the control position and whatnot, but not really with all the different performance characteristics. What I do remember is that it took a lot of clutch slipping to pull away from a standstill, like perhaps there was a carburation issue. The other thing I remember is that the riding position was the most sport oriented of all my bikes (and still is!). Fast forward 6 years on this bike and aging body of mine and the position seems even more sport-like!
So the time for a ride had come. It started up fine, just like it before. I pulled in the clutch and tapped it down into first. With the clutch still in and brake applied, it lunged forward violently as it choked the engine. Apparently, the sticky clutch plates needed to be broken loose (it reminded me of my old H1-500 with heavy duty clutch springs… did that if it sat longer than a day). I fired her up again. This time I bumped the revs up while stabbing it into 1st. Again a lunge, but it broke loose. We will see if it continues to do this after I change the tranny fluid.
As I pulled away for the first time, I noticed plenty of power to do so, even in the soft grassy soil of my yard. Check that one off the list! After a little ride down the entry lane, I finally made it to the main paved road. I tested the front and rear brakes a bit and all seemed fine there. The fronts are very powerful, as I had remembered.
Where the shop is, it is mostly rural 2-lane roads without much traffic, so I could open it up a bit. The first quirkiness I noticed on this bike was the shift lever position. The rider leg position suggests a lever pointed down to keep your foot on the peg while up or down shifting. But when I adjusted the lever where it felt right, it hit the kickstand spring during downshifts. I will need to poll the forum on this one to see what others have done.
Shifting quirks aside, it was on to the ride. It’s tough to resist bringing the revs up on a bike like this, and I succumbed to the temptation. It pulled hard and cleanly up to 9K or so. The smile on my face went was as wide as my helmet faceshield opening. While very timid sounding at the low revs, it turns into a ferocious animal at the high revs. It sounds so sweet when singing. It’s very addictive to keep the revs high and to push it harder and harder. You simply want to hold that throttle wide open.
After about 4 miles of smiles, the bike started losing power. It took more clutch slipping to pull away for a standstill, sort of like when I first bought the bike. My first thought was to head home or I might be pushing it home, so in that direction I turned. It was definitely down on power and getting worse. At this point, I was still about 3/4 miles from home. It was steadily losing power and I was limping along at no more than 5 mph. I WAS getting closer to home, but I wondered if I was doing damage to the engine by continuing to run. The engine finally died and I coasted to a driveway entrance where I could pull of the road. I had only gone 4 miles on this inaugural ride, but I realized I had just doubled my seat time on the bike. I thought, after all the updates I made to the bike, these last 4 miles sure were much more enjoyable than the first 4.
It was time to inspect the bike for anything visually wrong like leaking fluid or similar. Nothing (but I guess that was a GOOD thing). With a walkaround, I didn’t find anything wrong. It didn’t seem hot either. Then it finally occurred to me – FUEL!!! I thought I had put plenty in for a short ride, but what I overlooked was the break point between RUN position and RES on the fuel level in the tank. So the fuel valve was rotated to PRIME and I kicked a few times. She fired back up!!! How stupid of me. But at least there is some valuable information that came out of it. I was experiencing one cylinder at a time losing fuel. Power dropped in steps accordingly. There was plenty of time to switch over to reserve without the engine dying, had I thought about it. This is good to know if it happens in traffic. I also realized that one of the carbs may not have been metering proper 6 years ago, since the abnormally high clutch slippage was needed back then too. In retrospect, I should have drained the fuel as soon as I got home to measure exactly how much fuel was in the tank when reserve was hit. Oh well, I just need to keep plenty in there. The other noteworthy thing is that it fires up easily after running completely out of fuel on all 4 cylinders. And PRIME works!
At the end of the ride, I had logged 10 miles. Ignoring the fuel starvation issue, the bike performed beyond my expectations.
TEST RIDE #2 (25 miles)
With more fuel added, I logged 25 more trouble free miles on the bike. On that ride, I spent a lot more time riding it at a civilized speed and paying particular attention to the engine carburation at various revs and throttle openings. Someone has clearly spent some time tuning on this bike and setting it up correctly. Rick Lance said he had done some work on the bike in the past, so perhaps he is responsible for the sweet tune job. I don’t think I would change a thing in the carbs. Now, it is MY job to keep it running this great.
I also was able to get much more accustomed to the handling and ergonomics of bike. At 160kph (100mph), the bike seems very stable. 100kph (62mph) equates to 4800rpm on the tachometer. I’m not sure about the front sprocket, but I noticed the rear was a 40 tooth. The seat is sloped forward, so you tend to slide forward as you ride and I find the need to boost myself rearward quite often. The brakes performing well, and after a spirited ride, were not warm at all (well maybe I didn’t use the brake that much). At least it tells me they are not dragging.
I’ve been noticing the last couple of weeks that the horn operation is intermittent. Jiggling the wires gets it working again. My hunch is that there is a break in the wiring somewhere and I will need to get that sorted.
The temperature gauge was reading this at end of ride, but I built some heat on the long driveway back to the shop at idle speed. I am not sure where it is supposed to be. It was a 70F (21C) day, about perfect for riding.
Picture 430

Here are some pictures as the bike stands today. It is begging for some decals to be added, isn’t it? Another thing that occurred to me is maybe the bike would look better with the blue re-sprayed in black paint.
Picture 431

Picture 432

When I tore the carbs apart for a cleaning back in August, I told myself that I would have this bike back on the road before the end of the year.
MISSION ACCOMPLISHED!!!
TEST RIDE #1 (10 miles)
I was looking forward to this day for 6 years. AND, also dreading it at some small level for the potential problems that could ensue. I had quite a few things apart on this bike and any one of them could lead have led to a problem.
As explained earlier, the bike was starting properly on choke and seemed to rev cleanly once warmed up. But this was sitting stationary in front of the shop, and things like brakes, steering, etc. were still unknowns. It restarted on the first kick consistently so my confidence was building as I did the short engine trials.
When I bought the bike six years ago, I rode it a total of about 4 miles before tearing it apart, so I honestly remember very little from that test ride. With a completely foreign bike, the first miles are spent getting familiar with the control position and whatnot, but not really with all the different performance characteristics. What I do remember is that it took a lot of clutch slipping to pull away from a standstill, like perhaps there was a carburation issue. The other thing I remember is that the riding position was the most sport oriented of all my bikes (and still is!). Fast forward 6 years on this bike and aging body of mine and the position seems even more sport-like!
So the time for a ride had come. It started up fine, just like it before. I pulled in the clutch and tapped it down into first. With the clutch still in and brake applied, it lunged forward violently as it choked the engine. Apparently, the sticky clutch plates needed to be broken loose (it reminded me of my old H1-500 with heavy duty clutch springs… did that if it sat longer than a day). I fired her up again. This time I bumped the revs up while stabbing it into 1st. Again a lunge, but it broke loose. We will see if it continues to do this after I change the tranny fluid.
As I pulled away for the first time, I noticed plenty of power to do so, even in the soft grassy soil of my yard. Check that one off the list! After a little ride down the entry lane, I finally made it to the main paved road. I tested the front and rear brakes a bit and all seemed fine there. The fronts are very powerful, as I had remembered.
Where the shop is, it is mostly rural 2-lane roads without much traffic, so I could open it up a bit. The first quirkiness I noticed on this bike was the shift lever position. The rider leg position suggests a lever pointed down to keep your foot on the peg while up or down shifting. But when I adjusted the lever where it felt right, it hit the kickstand spring during downshifts. I will need to poll the forum on this one to see what others have done.
Shifting quirks aside, it was on to the ride. It’s tough to resist bringing the revs up on a bike like this, and I succumbed to the temptation. It pulled hard and cleanly up to 9K or so. The smile on my face went was as wide as my helmet faceshield opening. While very timid sounding at the low revs, it turns into a ferocious animal at the high revs. It sounds so sweet when singing. It’s very addictive to keep the revs high and to push it harder and harder. You simply want to hold that throttle wide open.
After about 4 miles of smiles, the bike started losing power. It took more clutch slipping to pull away for a standstill, sort of like when I first bought the bike. My first thought was to head home or I might be pushing it home, so in that direction I turned. It was definitely down on power and getting worse. At this point, I was still about 3/4 miles from home. It was steadily losing power and I was limping along at no more than 5 mph. I WAS getting closer to home, but I wondered if I was doing damage to the engine by continuing to run. The engine finally died and I coasted to a driveway entrance where I could pull of the road. I had only gone 4 miles on this inaugural ride, but I realized I had just doubled my seat time on the bike. I thought, after all the updates I made to the bike, these last 4 miles sure were much more enjoyable than the first 4.
It was time to inspect the bike for anything visually wrong like leaking fluid or similar. Nothing (but I guess that was a GOOD thing). With a walkaround, I didn’t find anything wrong. It didn’t seem hot either. Then it finally occurred to me – FUEL!!! I thought I had put plenty in for a short ride, but what I overlooked was the break point between RUN position and RES on the fuel level in the tank. So the fuel valve was rotated to PRIME and I kicked a few times. She fired back up!!! How stupid of me. But at least there is some valuable information that came out of it. I was experiencing one cylinder at a time losing fuel. Power dropped in steps accordingly. There was plenty of time to switch over to reserve without the engine dying, had I thought about it. This is good to know if it happens in traffic. I also realized that one of the carbs may not have been metering proper 6 years ago, since the abnormally high clutch slippage was needed back then too. In retrospect, I should have drained the fuel as soon as I got home to measure exactly how much fuel was in the tank when reserve was hit. Oh well, I just need to keep plenty in there. The other noteworthy thing is that it fires up easily after running completely out of fuel on all 4 cylinders. And PRIME works!
At the end of the ride, I had logged 10 miles. Ignoring the fuel starvation issue, the bike performed beyond my expectations.
TEST RIDE #2 (25 miles)
With more fuel added, I logged 25 more trouble free miles on the bike. On that ride, I spent a lot more time riding it at a civilized speed and paying particular attention to the engine carburation at various revs and throttle openings. Someone has clearly spent some time tuning on this bike and setting it up correctly. Rick Lance said he had done some work on the bike in the past, so perhaps he is responsible for the sweet tune job. I don’t think I would change a thing in the carbs. Now, it is MY job to keep it running this great.
I also was able to get much more accustomed to the handling and ergonomics of bike. At 160kph (100mph), the bike seems very stable. 100kph (62mph) equates to 4800rpm on the tachometer. I’m not sure about the front sprocket, but I noticed the rear was a 40 tooth. The seat is sloped forward, so you tend to slide forward as you ride and I find the need to boost myself rearward quite often. The brakes performing well, and after a spirited ride, were not warm at all (well maybe I didn’t use the brake that much). At least it tells me they are not dragging.
I’ve been noticing the last couple of weeks that the horn operation is intermittent. Jiggling the wires gets it working again. My hunch is that there is a break in the wiring somewhere and I will need to get that sorted.
The temperature gauge was reading this at end of ride, but I built some heat on the long driveway back to the shop at idle speed. I am not sure where it is supposed to be. It was a 70F (21C) day, about perfect for riding.
Picture 430
Here are some pictures as the bike stands today. It is begging for some decals to be added, isn’t it? Another thing that occurred to me is maybe the bike would look better with the blue re-sprayed in black paint.
Picture 431
Picture 432
When I tore the carbs apart for a cleaning back in August, I told myself that I would have this bike back on the road before the end of the year.
MISSION ACCOMPLISHED!!!
Project bike links: NS400R - TRIPLE THREAT // RZ500 - MOSQUITO CONTROL BIKE // RZ350 - REVIVAL
'72 H1-500/'75 H1-500/'85 RZ350/'85 NS400R/'01 DR650/'07 FJR1300/'18 Tiger 1200
'72 H1-500/'75 H1-500/'85 RZ350/'85 NS400R/'01 DR650/'07 FJR1300/'18 Tiger 1200
-
TwoStrokeNut
- Posts: 585
- Joined: Tue Nov 20, 2012 5:12 pm
- Location: Florida,USA
Re: Operation: MOSQUITO CONTROL BIKE - Florida RZ500 Project
Service E05 – Troubleshoot turn signal failure at high rpm...
On the test rides, I had the turn signals on while revving it up pretty high and they didn’t miss a beat. Perhaps my re-wiring job removed the gremlin. At any rate, I will check this one off the list.
E05 Total Cost: US$0.00 (could not duplicate failure)
On the test rides, I had the turn signals on while revving it up pretty high and they didn’t miss a beat. Perhaps my re-wiring job removed the gremlin. At any rate, I will check this one off the list.
E05 Total Cost: US$0.00 (could not duplicate failure)
Project bike links: NS400R - TRIPLE THREAT // RZ500 - MOSQUITO CONTROL BIKE // RZ350 - REVIVAL
'72 H1-500/'75 H1-500/'85 RZ350/'85 NS400R/'01 DR650/'07 FJR1300/'18 Tiger 1200
'72 H1-500/'75 H1-500/'85 RZ350/'85 NS400R/'01 DR650/'07 FJR1300/'18 Tiger 1200

Re: Operation: MOSQUITO CONTROL BIKE - Florida RZ500 Project
Well done! great post. Really enjoyed reading that, felt like i was there. Mission Accomplished indeed!
www.2smoked.com
80 XT500 Supermoto!
81 RD350LC Resto
82 RD421LC Hybrid
82 RD250LC '251LC' YPVS
83 RZ350 Resto
84 RZ500 Resto
85 RZ350 F1 Resto
86 RZ350 F2 Resto
86 RZ350 F2 Hybrid
Like Watches? www.PloProf.com & www.DeskDivers.com
80 XT500 Supermoto!
81 RD350LC Resto
82 RD421LC Hybrid
82 RD250LC '251LC' YPVS
83 RZ350 Resto
84 RZ500 Resto
85 RZ350 F1 Resto
86 RZ350 F2 Resto
86 RZ350 F2 Hybrid
Like Watches? www.PloProf.com & www.DeskDivers.com
-
silverstrom
- - - - - -

- Posts: 3241
- Joined: Sat Feb 04, 2012 7:36 am
Re: Operation: MOSQUITO CONTROL BIKE - Florida RZ500 Project
Great work. A long time coming, but success at last!
Brilliant job documenting the project.
Brilliant job documenting the project.
Re: Operation: MOSQUITO CONTROL BIKE - Florida RZ500 Project
Great read that, congrats on getting her up and running so well.
-
lost1750GTV
- - - - - -
- Posts: 609
- Joined: Thu May 24, 2018 5:22 pm
Re: Operation: MOSQUITO CONTROL BIKE - Florida RZ500 Project
congrats!
I'd keep the blue/yellow.
cheery bike.
I'd keep the blue/yellow.
cheery bike.