How to Rebuild Your R1 Forks

General forum on frames, brakes, suspension, wheels and tires

Moderator: rztom

Message
Author
trix
- - - - -
- - - - -
Posts: 371
Joined: Mon Feb 25, 2008 11:44 am
Location: Northern Ireland

How to Rebuild Your R1 Forks

#1 Post by trix » Thu Nov 20, 2008 9:49 pm

I couldn't find any clear instructions on rebuidling my 2000 year (4XV??) R1 forks so I've put some info here that may be useful for some of you. Thanks to smurph for putting up a link to the R1 service manual. For anyone who wants to rebuild R1 forks without using Yamaha tools do the following;

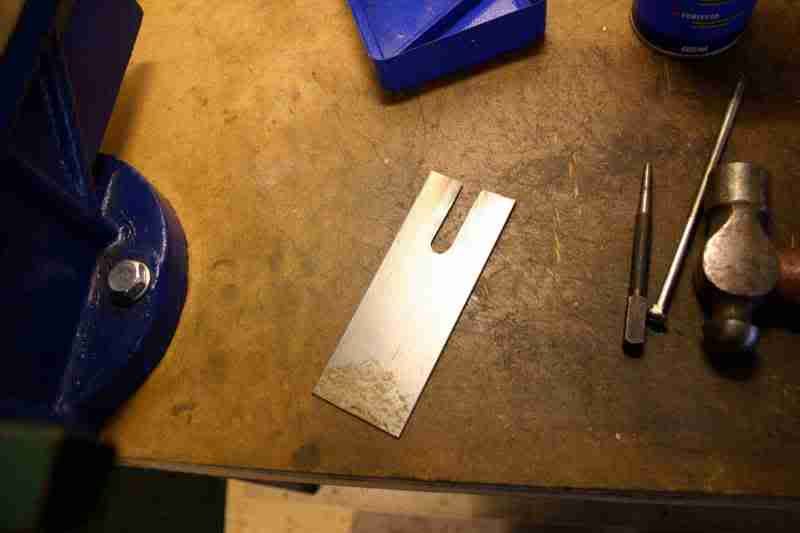
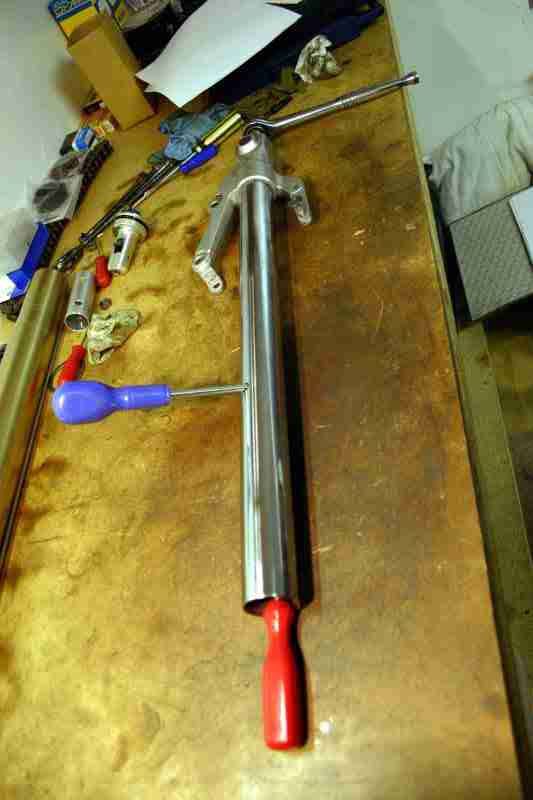
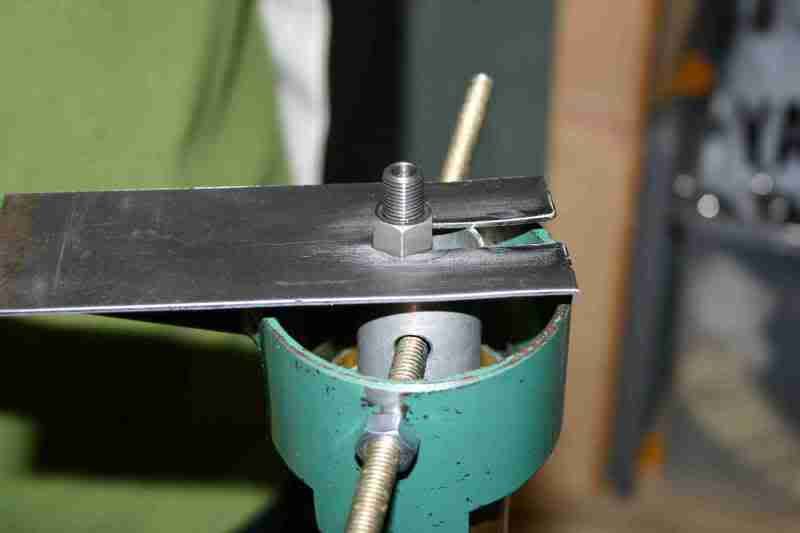
You'll need to make a rod holder. A piece of steel with a 10mm hole drilled in it and then a slot cut up to meet the hole will do;
Image

You'll also need a spring compressor. A piece of pipe with two tapped holes to accomodate a pair of screws or bolts will work. I used the tubular part of a flywheel holding tool;
Image

Undo the cap and drain the old oil out. Then use the spring compressor with the bolts fitting into the holes in the spacer;
Image

Push the spring down and have an assistant put the rod holder in place;
Image

Image

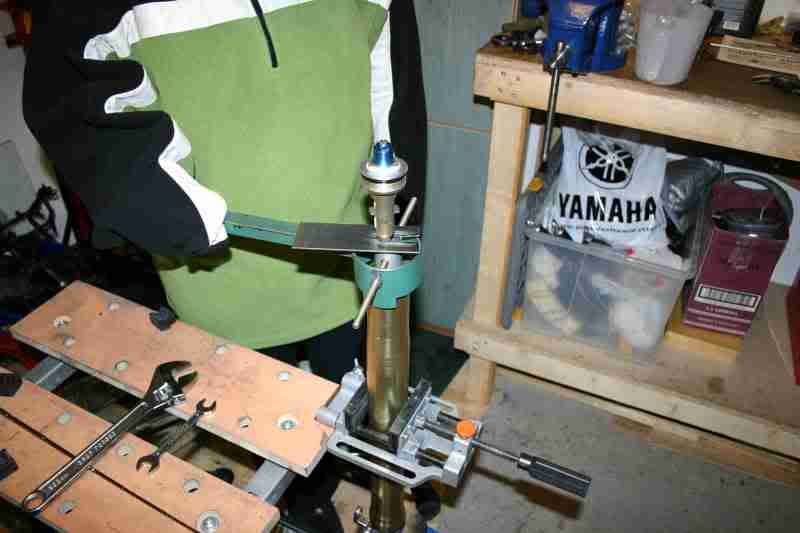
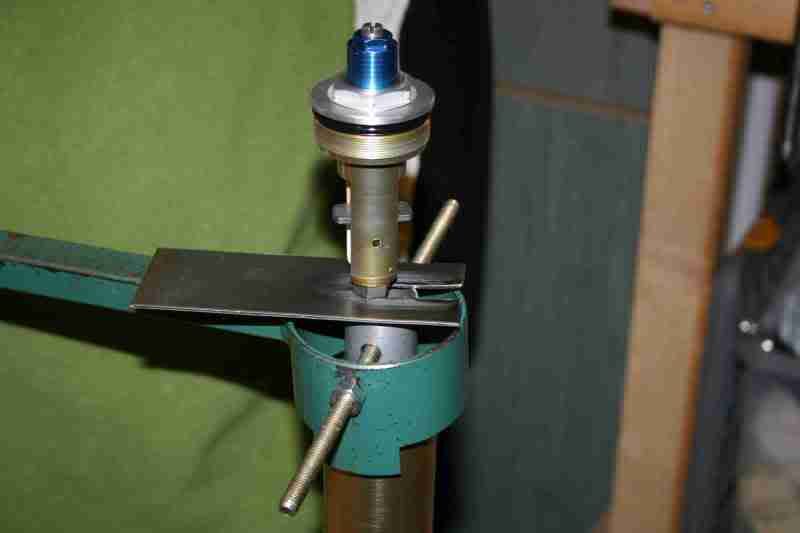
Remove the cap bolt and adjuster assembly;
Image

Image

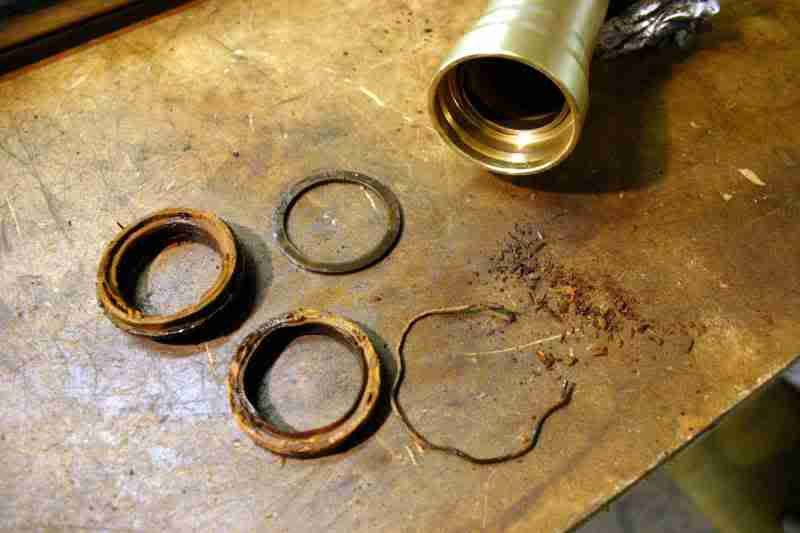
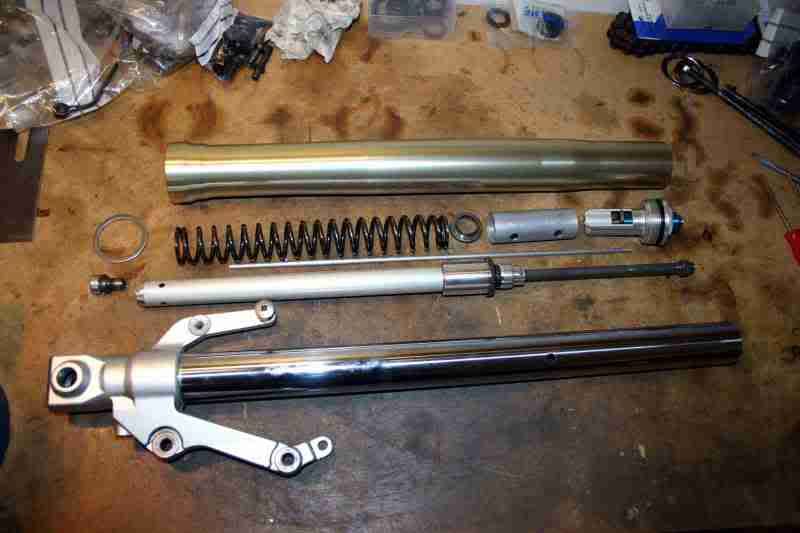
Undo the nut and you can then remove the spacer, spring seat and spring. Then remove the outer tube and remove your old seals, washer and clip;
Image

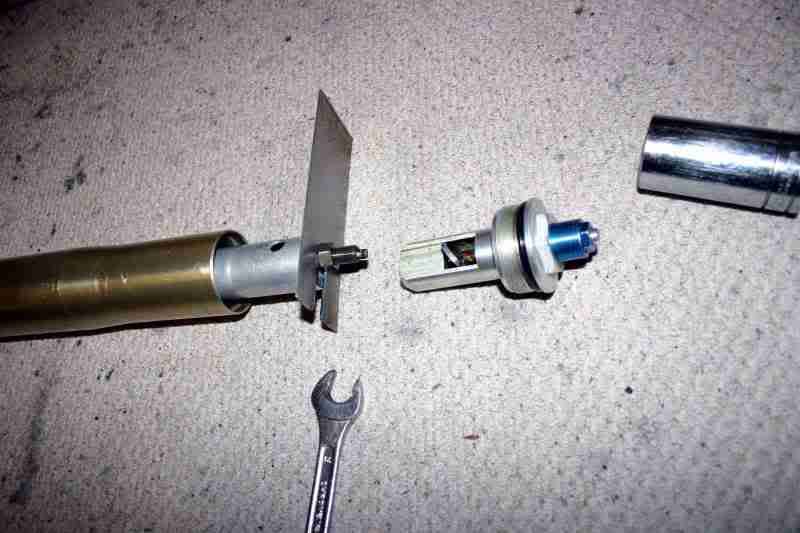
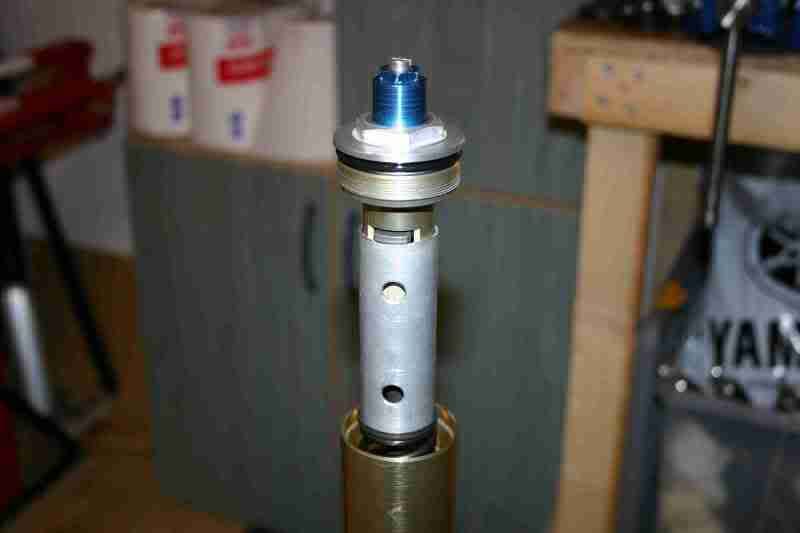
If you want to remove the damper rod assembly, use an impact wrench to loosen the cap head bolt at the base of the fork leg. Then put a long reach screwdriver down the inside of the tube and another through the hole in the inner tube to hold the damper rod in place while undoing the cap head screw all the way out.
Image

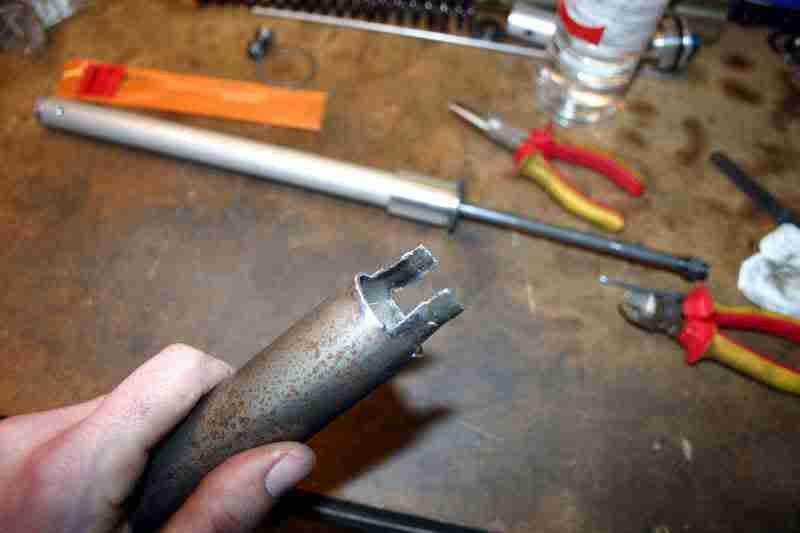
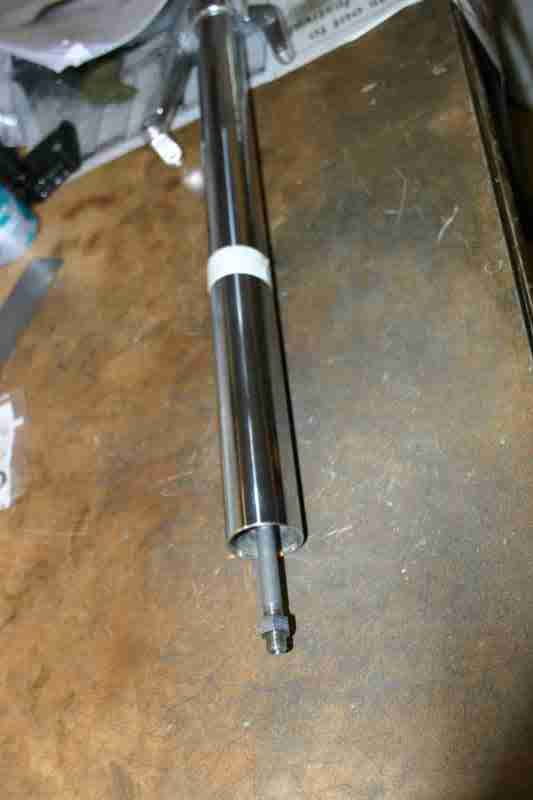
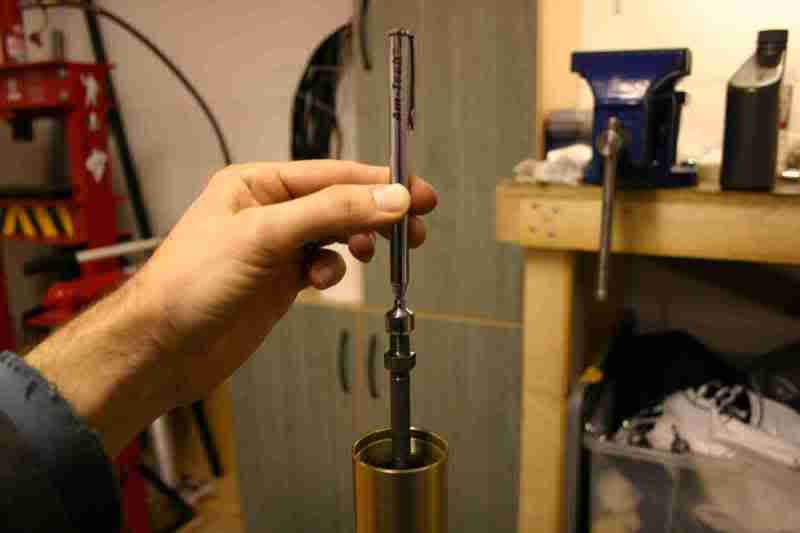
You will then end up with this;

Image

Once you have the damper rod asembly out, you can make a holding tool to fit. I used a piece of pipe and removed material at one end to form two tangs. This is required to put it all back togethter;
Image

Image

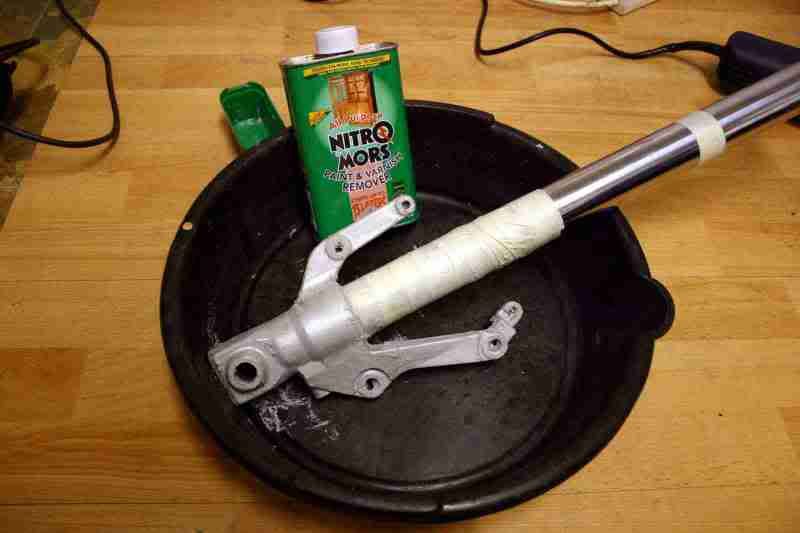
Remove all the paint off the bottom of the fork leg;
Image

Use a flap wheel to abrade the casting seams off the alloy casting;
Image

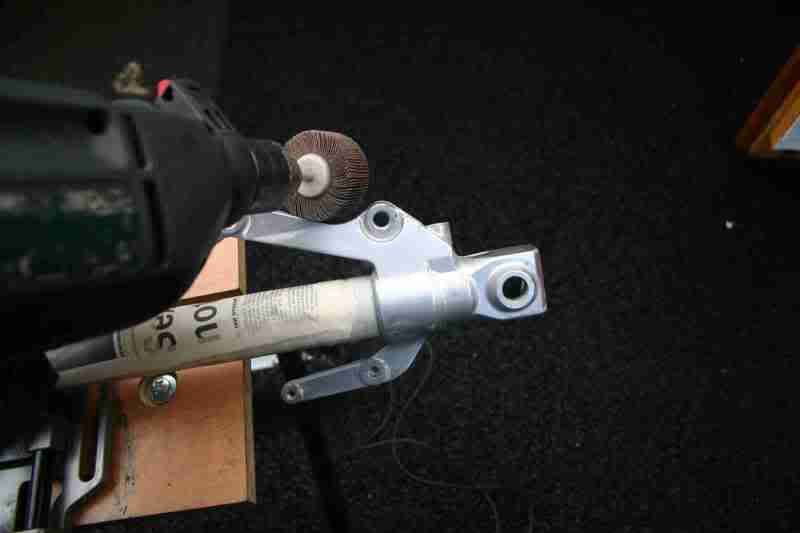
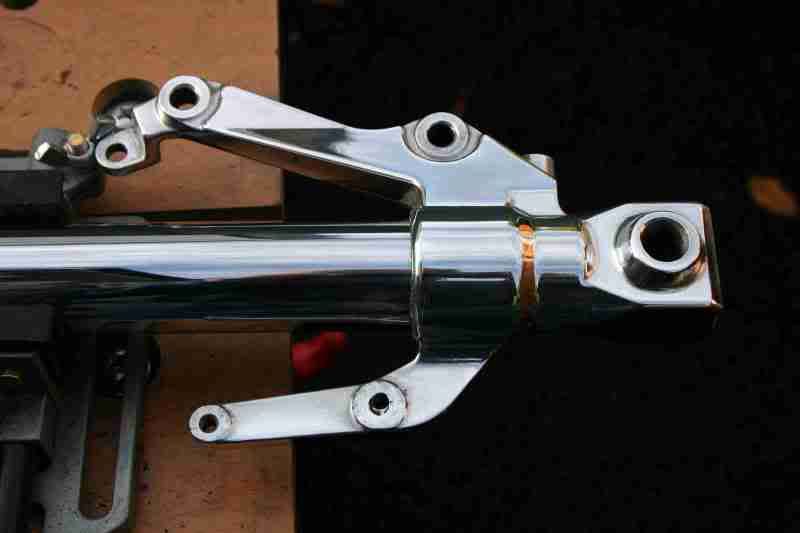
Abrade the alloy to a satin finish and then polish to a mirror finish;
Image

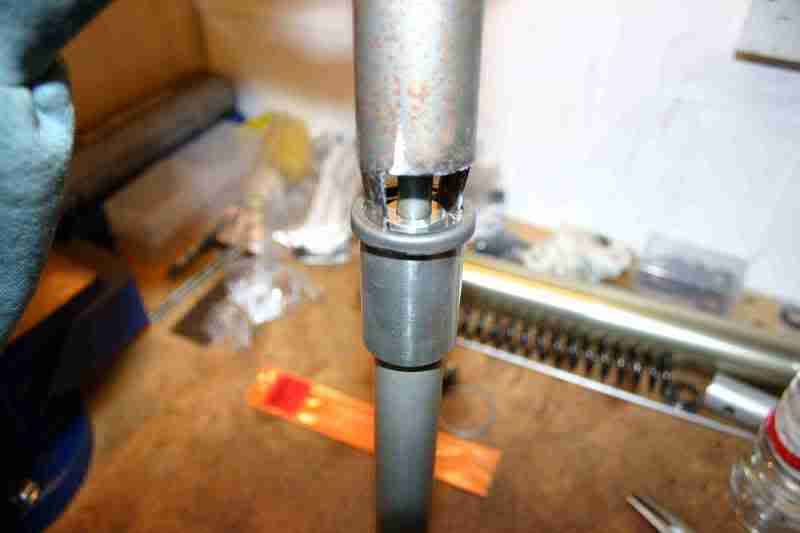
Use your damper rod holding tool to put your damper rod back in. Make sure to use a new copper washer on the cap head bolt and put thread locking compound on the threads. Torque it to 40Nm
Image

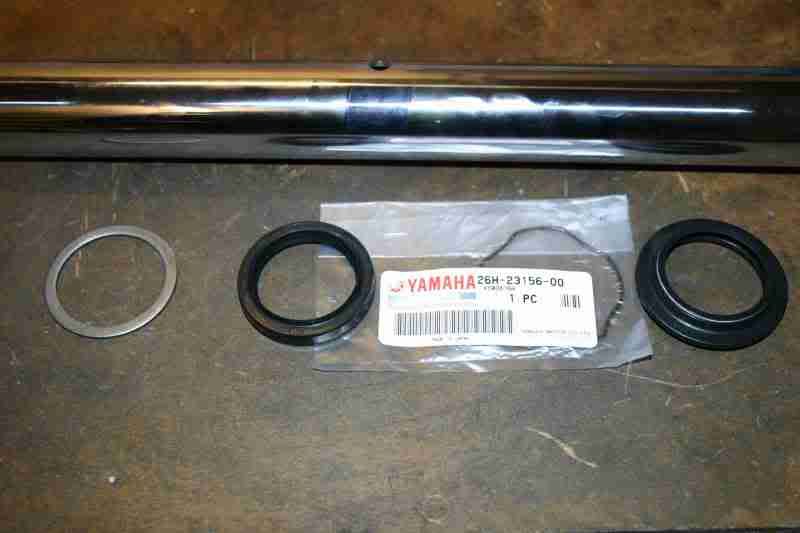
Assemble your washer, new seals and clip;
Image

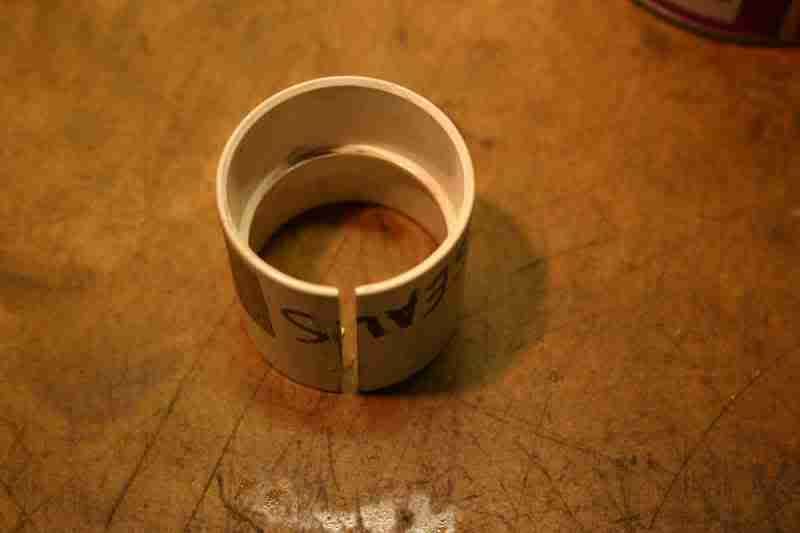
Make a seal driving tool. A straight connector for 40mm PVC pipe with one side slit open works fine. Available from BandQ, Homebase, Lowes, Home Depot etc!

Image

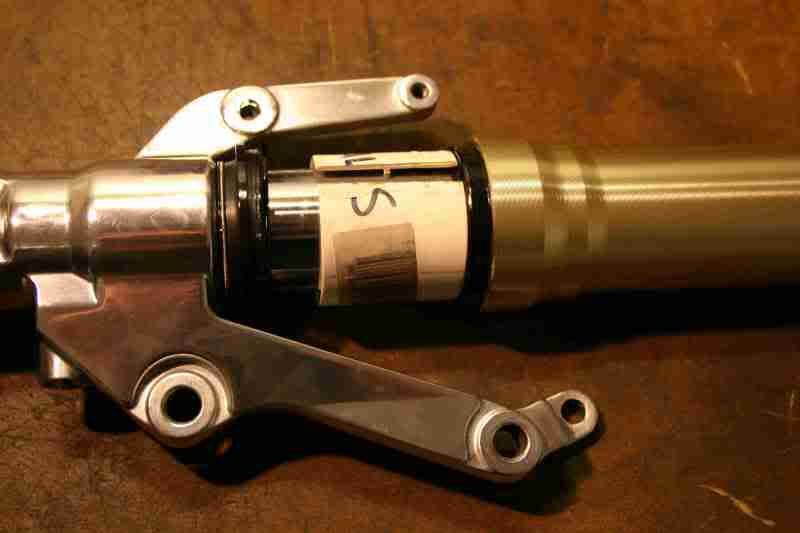
Put the dust seal and oil seal onto the inner tube. Grease them up with lithium grease first. Put a plastic bag over the top of the inner tube and lube it up before you push the seals on, to prevent the sharp edge of the inner tube cutting the rubber seals. Then put your seal driver over the inner tube as shown and push the outer tube on;
Image

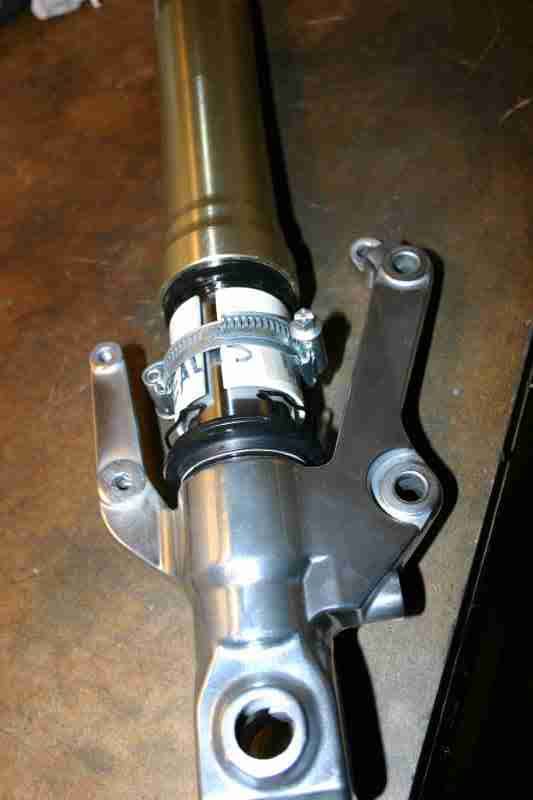
Now put a jubilee/hoseclip around your seal driver and tighten it up really tight;
Image

Whack the oil seal in and remove the seal driver. Put your new clip in and make sure it is fully seated in its groove. Then push the dust seal into place.This can usually be done by hand, without using the seal driver.

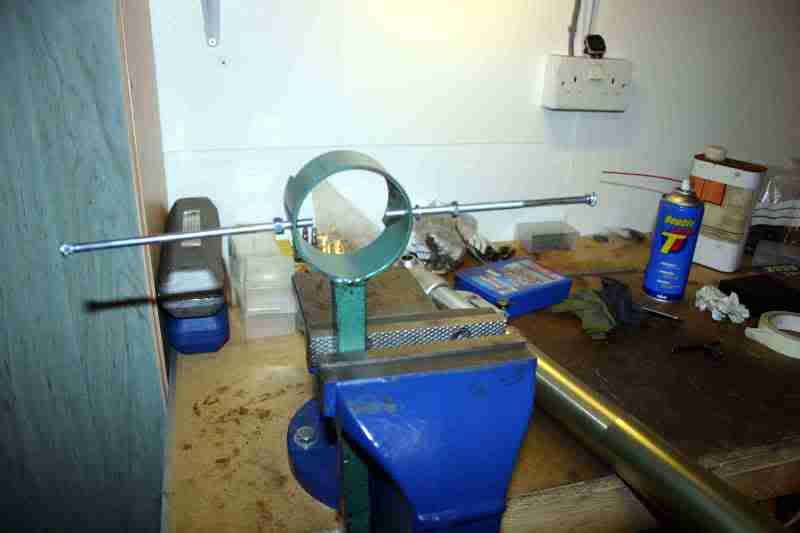
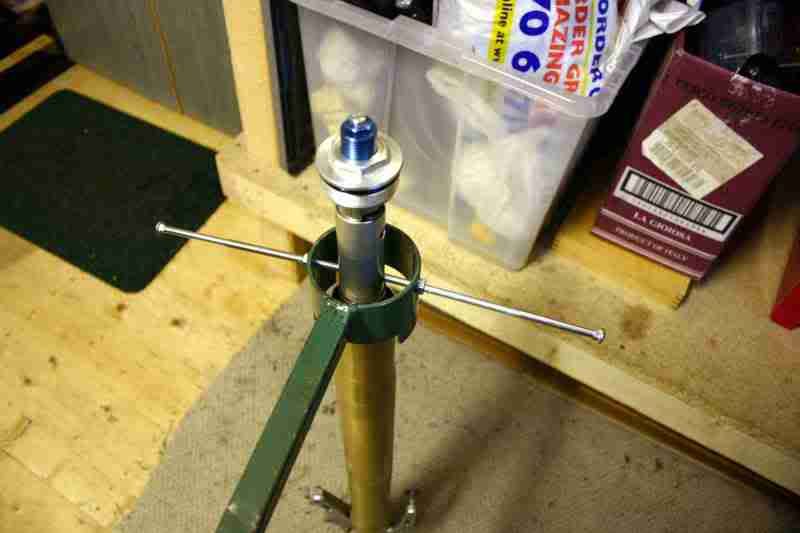
Now put your partially assembled fork leg into your Mexican fork leg holder;
Image

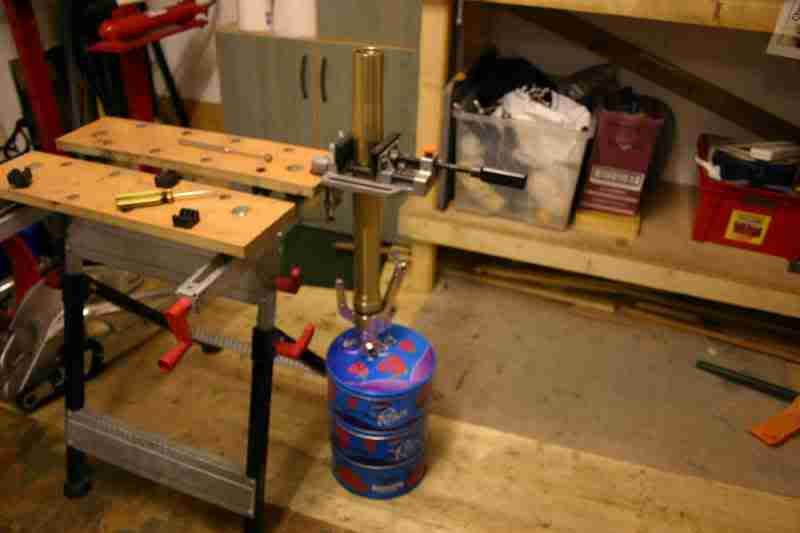
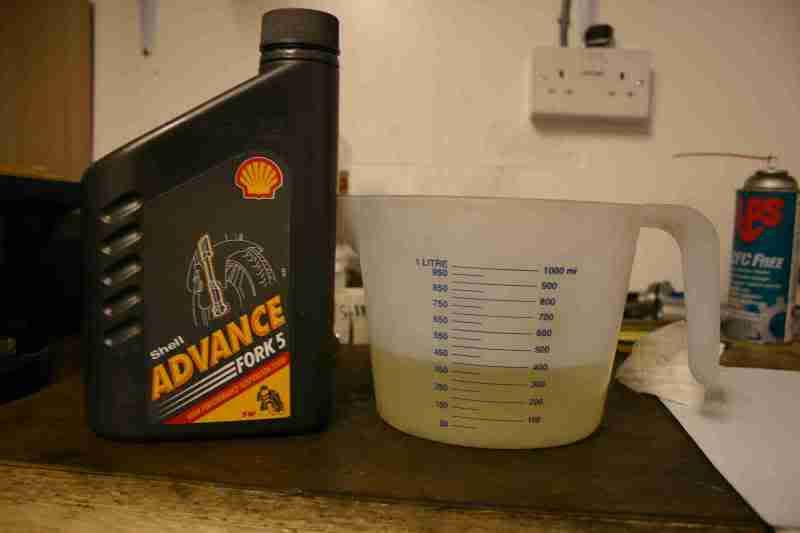
Measure out about 450ml of fork oil. I'm using grade 5;
Image

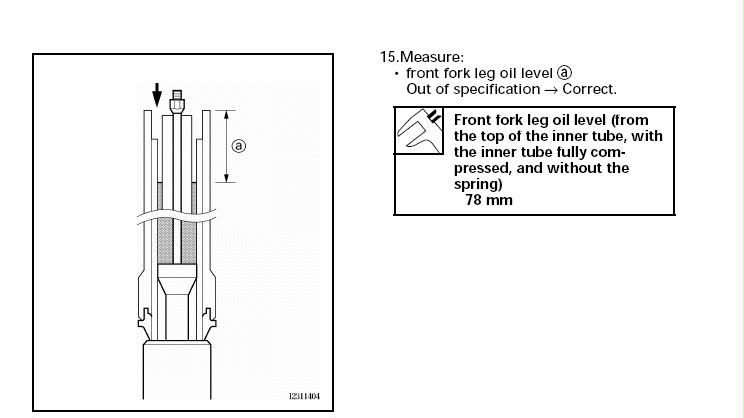
Pour the oil in, then pump the damper rod up and down about 10 times to get all the air out. Then pump the outer tube up and down several times. Do all this pumping slowly and then leave to stand for 10 mins to allow the oil to settle and all the air to escape. The capacity is 477ml, so now you will need to add more oil. Add oil slowly to bring the level up to a position 78mm below the top of the inner tube. Incidentally, one of those "pick up" magnets is ideal for lifting the damper rod up and down;
Image

Adjust the nut on the damper rod such that it is 11mm below the top of the rod.
Image

Feed the spring, the spring seat and the spacer down over the top of your magnetic "pick up " tool and down into the fork leg. Again using your spring compressor, push on the spacer while an assistant pulls the damper rod up with the magnet and then slips the holder into place;
Image

Screw on your top cap and then tighten it against the nut (15Nm) but dont forget to put your damper adjusting rod down through the hole in the damper rod first. Push down on the spacer again while your assistant quickly removes the holder, then remove the spring compressor.
Image

Pull up the outer tube and hand tighten the cap for now.You can tighten it fully when the forks are clamped in the yokes. Repeat the procedure on the other leg. Et Voila, two reconditioned, polished R1 forks, ready to go into my RD500. I must call Nigel and see if my modified yokes are ready yet.
Image

gpaddict
Posts: 341
Joined: Mon Nov 06, 2006 8:30 pm
Location: wisconsin
Contact:

#2 Post by gpaddict » Thu Nov 20, 2008 10:22 pm

Nice write up Trix, thanks for taking the time to share.

User avatar
wolfgangh
- - - - -
- - - - -
Posts: 1003
Joined: Thu Nov 17, 2005 5:37 am
Location: Vienna, Austria
Contact:

#3 Post by wolfgangh » Fri Nov 21, 2008 5:28 am

Thanks for the efforts to take all the pictures for us! Exspecially guys who are not so firm in english like me take big advantage of the pictures. Funny enough, I rebuilt an OHLINS front end (APRILIA Mille SP) yesterday, the construction is very similar but not identical. The OHLINS fork does not have the allen bolt on the bottom to loosen the damper rod.

User avatar
Grumpy
Posts: 213
Joined: Mon Oct 15, 2007 2:43 am
Location: Northern Ireland

R1 forks

#4 Post by Grumpy » Fri Nov 21, 2008 6:55 am

Trix: Nice article, and good job. Though I would like to clarify a couple of points.

1) When you fit the fork seal you'll find it easier to install the seal to the outer-tube before you fit the outer-tube to the inner-tube. Just use red rubber grease on the seal and the outer-tube then push the seal home with your fingers, (no chance of damaging the seal with a driver).

2) Regarding oil-level, (air-gap): Once you have bled the air from the cartridge, let the outer-tube rest on the fork bottom, push the piston shaft all the way to the bottom of its stroke and set the final oil-level measuring from the top of the outer-tube. (I have set-up quite a few of these forks and have found 120 - 130mm works really well. The 78mm level quoted by Yamaha will give quite a harsh ride over bumps especially when you're braking. (There is a hydraulic bump-stop built into these cartridge systems which will prevent the fork from bottoming anyway).

Wolfgang: The Ohlins fork has the cartridge screwed directly into the fork bottom, (hence no cap-screw). This makes for easier/cleaner servicing of the fork, and the possibility to make changes to the shim stacks on the main piston without having to drain the oil every-time.
The older I get, the faster I was!


Bikes:
RZV500R
RD350LC (x2)
KH500
RD350N2
CB500/4 K1
CB400/4 F1
Ducati Monster 1100

trix
- - - - -
- - - - -
Posts: 371
Joined: Mon Feb 25, 2008 11:44 am
Location: Northern Ireland

#5 Post by trix » Sat Nov 22, 2008 7:52 am

Grumpy;Thanks for those tips.It did seem like it would be easier to install the seals into the outer tubes first; I was just worried about how to get the inner tubes through the seals without damaging them.When you install them on the inner tube first, you have good access all around the seal with your fingers to ensure the seal lips aren't getting caught on the tube.But your idea sounds even better and if it works I would definitely recommend it. Next time I'll do it your way! I must admit I'd never heard of "red rubber grease". I'll have to get a tub of that stuff; it sounds like I should have been using that even doing it my old way.

Your method for measuring the oil level from the top of the outer tube; wouldn't this depend on the thickness of the dust seal (as this will affect the height of the outer tube when it's all the way down). I used non original dust seals and they are slightly taller. I suppose it would only be a matter of a few mm and again I suppose so long as the level is equal in both legs it wouldn't make a huge difference.

Funnily enough, Yamaha state that the 78mm is measured from the top of the inner tube but their diagram (right beside the wording) shows the measurement from the top of the outer tube:

Image

I assumed that their diagram is wrong?? If their diagram is right, and their wording is wrong; then my airgap is bigger than that recommended by Yamaha, and it's closer to what you recommend! What do you reckon grumpy?

I'll see what it's like when (if ever!) I get to ride the bike.
Last edited by trix on Sat Jan 05, 2013 5:34 pm, edited 1 time in total.

User avatar
Grumpy
Posts: 213
Joined: Mon Oct 15, 2007 2:43 am
Location: Northern Ireland

R1 forks

#6 Post by Grumpy » Sat Nov 22, 2008 8:57 am

That's just typical Japanese factory manuals :grin: They tend to get a little bit lost in translation :???: If you read the text it says"from the top of the inner tube, with the inner tube fully compressed", personally, I wouldn't like to try compressing an inner-tube :shock:
If you're somewhere in the 80 - 90 kg range your 500 will benefit from 130mm oil-level and about 9.0 to 9.25N/mm springs with around 6 - 8mm preload and at the rear, (using the std rear linkage?), a 130 to 140 N/mm spring at approx 10 - 12mm preload.
The older I get, the faster I was!


Bikes:
RZV500R
RD350LC (x2)
KH500
RD350N2
CB500/4 K1
CB400/4 F1
Ducati Monster 1100

User avatar
hybrid
Site Admin
Posts: 1203
Joined: Tue Nov 29, 2005 2:33 am
Location: Sydney, Australia
Contact:

#7 Post by hybrid » Sat Nov 22, 2008 6:54 pm

trix,
after meeting Grumpy, I'd pretty much take on board EVERYTHING he suggests :cool:

trix
- - - - -
- - - - -
Posts: 371
Joined: Mon Feb 25, 2008 11:44 am
Location: Northern Ireland

#8 Post by trix » Sun Nov 23, 2008 6:50 pm

OK. I'm about 70kg.
What rate are the standard R1 springs?
I'm putting an R6 Swingarm in the back with brackets welded on to allow use of the standard linkage. Its a bit longer than the standard arm (dont know exactly how much longer yet, I had it sent straight to NK to modify it)
What options do I have for the rear shock grumpy; how (or from whom) can I buy a rear shock and specify the spring rate?

User avatar
smurph
- - - - -
- - - - -
Posts: 864
Joined: Mon Nov 14, 2005 2:39 pm
Location: Cullman, AL - USA
Contact:

#9 Post by smurph » Sun Nov 23, 2008 10:05 pm

Noce post Trix!

The 98-01 R1 forks have a .750 kg/mm spring rate.

The 02-03 R1 forks have a .810 kg/mm rate.

Steve
Fuel Injected RZ350

User avatar
Grumpy
Posts: 213
Joined: Mon Oct 15, 2007 2:43 am
Location: Northern Ireland

#10 Post by Grumpy » Mon Nov 24, 2008 2:09 pm

At your weight Trix, (depending on use), 8.75 - 9.0 N/mm front springs, and a 125 - 130 N/mm rear spring. (You would just need to check your sag measurements). Most suspension suppliers should offer to supply a new shock fitted with the spring rate you require. If you're stuck, give me a shout when I'm home and I'll see what I can do for you springs.
(I'll be home on 1st Dec.)
The older I get, the faster I was!


Bikes:
RZV500R
RD350LC (x2)
KH500
RD350N2
CB500/4 K1
CB400/4 F1
Ducati Monster 1100

User avatar
wolfgangh
- - - - -
- - - - -
Posts: 1003
Joined: Thu Nov 17, 2005 5:37 am
Location: Vienna, Austria
Contact:

#11 Post by wolfgangh » Mon Nov 24, 2008 4:26 pm

Hello Grumpy,
I would think the spring rate also depends on the rake of the frontend - the steeper, the stiffer.
On my Rainey bike (160kg dry, I have 80kg incl. gear) I use a 9.5kp/mm spring at a very agressive rake of 67.5 deg and it is just right. Anything less would be too soft for track use.

Your recommendation sounds good, may be a bit on the soft side.

User avatar
Grumpy
Posts: 213
Joined: Mon Oct 15, 2007 2:43 am
Location: Northern Ireland

#12 Post by Grumpy » Mon Nov 24, 2008 6:45 pm

Hi Wolfgang,
You're correct in thinking steering head-angle will affect the front spring rate we use.
But you're thinking of "steeper angle = stiffer springs", is wrong.
The more you open the steering-head angle (ie 23degs to 24degs) means you put the fork in a more "natural" plane. So when the rider brakes, the fork, sitting less inclined to the vertical, has less bending moment and therefore moves easier, (less stiction), so it needs more spring to support the moving mass of the bike in this angle.
Your front spring-rate depends on so much more than just machine weight or rider body weight.
Riding environment,(track or street)? How smooth or aggressive the rider is on braking? Machine geometry? Fork oil-level? All of these things and more come into the equation.
Your front spring-rate sounds to be in the ball-park for a 160kg bike, (ie: superbike weight), in race-track use.
But you can open Pandora's Box here.
There is no definitive answer that can be offered without knowing all the parameters.
For example;
As far as I know, your bike uses an Aprilia swing-arm?
Is the Aprilia swing-arm shorter than the Yamaha swing-arm?
If so that will put more weight on the front of the bike, therefore it will need a stronger front spring.
Is your bike higher at the rear than a standard RD/RZ500?
If so again it will need a stronger front set-up.
So what I'm saying to Trix is, If his bike is going to be primarily for street use, given his machine weight, body weight and relatively standard geometry, I would suggest this as a good start point for his suspension set-up.
ps: The best comparison for our bikes would be 600cc World Super Sport machines, (165kg and road going chassis), most of these machines use 8.5 - 9.0 N/mm springs, (in fairly extreme track riding :razz:)
Sorry for the rant but I've been awake for hours tonight, (jet-lagged in Australia). I promise my next post won't be half as long, (or half as boring), I'll just drink more whisky before going to bed. . .
Last edited by Grumpy on Thu Nov 27, 2008 9:14 am, edited 1 time in total.
The older I get, the faster I was!


Bikes:
RZV500R
RD350LC (x2)
KH500
RD350N2
CB500/4 K1
CB400/4 F1
Ducati Monster 1100

gus
- - - - -
- - - - -
Posts: 866
Joined: Sun Jul 09, 2006 2:21 pm
Location: N. Carolina

#13 Post by gus » Thu Nov 27, 2008 1:04 am

Grumpy, glad to see your back with us normal folks, will you be back with Rizla again next year?

User avatar
Grumpy
Posts: 213
Joined: Mon Oct 15, 2007 2:43 am
Location: Northern Ireland

#14 Post by Grumpy » Thu Nov 27, 2008 1:43 am

Hi Gus,
I'll be back in the same place next year, (no rest for the wicked eh?).
Any ideas if you guys are going to make it to Laguna or Indy? If so, maybe we'll try and hook up a bit earlier this time?
The older I get, the faster I was!


Bikes:
RZV500R
RD350LC (x2)
KH500
RD350N2
CB500/4 K1
CB400/4 F1
Ducati Monster 1100

gus
- - - - -
- - - - -
Posts: 866
Joined: Sun Jul 09, 2006 2:21 pm
Location: N. Carolina

#15 Post by gus » Thu Nov 27, 2008 9:08 am

hey Grump, we always planned on driving the motorhome and gas prices eliminated anyone from going the last couple of years, now its cheap maybe it will stay there, if they get out of control again I'm flyin so I'll be at both places.

Post Reply